SSブログ
エステ

802.11a 無線LANアクセスポイント構築 [Hostapd で無線LAN AP構築]

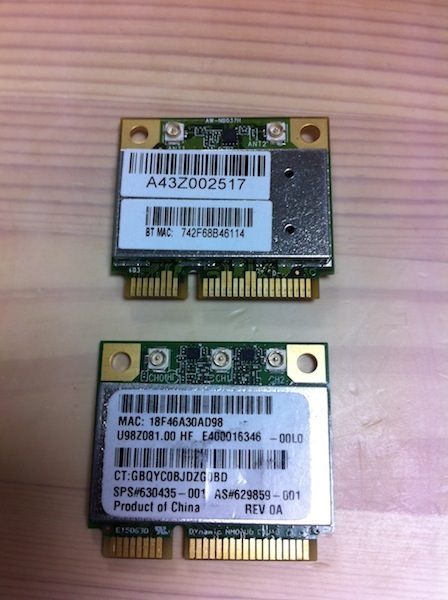
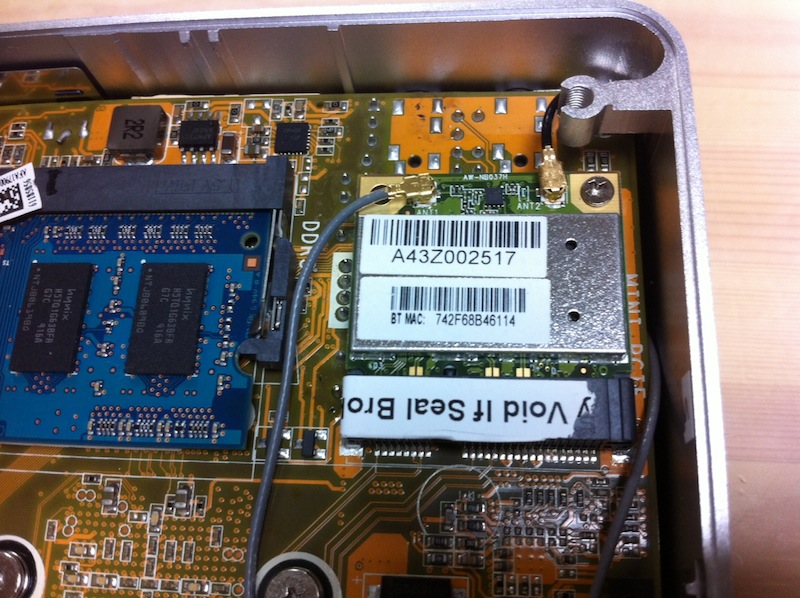
前回、AR9285ベースの無線LANカードからAR9380ベースの無線LANカードへ換装して、Ubuntu 12.04から認識まできました。

無事ではないですが、認識されたので、その後の設定です。
あまり変更するところはないはずですが。

# iw list
Wiphy phy0
Band 1:
Capabilities: 0x11ef
RX LDPC
HT20/HT40
SM Power Save disabled
RX HT20 SGI
RX HT40 SGI
TX STBC
RX STBC 1-stream
Max AMSDU length: 3839 bytes
DSSS/CCK HT40
Maximum RX AMPDU length 65535 bytes (exponent: 0x003)
Minimum RX AMPDU time spacing: 8 usec (0x06)
HT TX/RX MCS rate indexes supported: 0-23
Frequencies:
* 2412 MHz [1] (17.0 dBm)
* 2417 MHz [2] (17.0 dBm)
* 2422 MHz [3] (17.0 dBm)
* 2427 MHz [4] (17.0 dBm)
* 2432 MHz [5] (17.0 dBm)
* 2437 MHz [6] (17.0 dBm)
* 2442 MHz [7] (17.0 dBm)
* 2447 MHz [8] (17.0 dBm)
* 2452 MHz [9] (17.0 dBm)
* 2457 MHz [10] (17.0 dBm)
* 2462 MHz [11] (17.0 dBm)
* 2467 MHz [12] (17.0 dBm)
* 2472 MHz [13] (17.0 dBm)
* 2484 MHz [14] (disabled)
Bitrates (non-HT):
* 1.0 Mbps
* 2.0 Mbps (short preamble supported)
* 5.5 Mbps (short preamble supported)
* 11.0 Mbps (short preamble supported)
* 6.0 Mbps
* 9.0 Mbps
* 12.0 Mbps
* 18.0 Mbps
* 24.0 Mbps
* 36.0 Mbps
* 48.0 Mbps
* 54.0 Mbps
Band 2:
Capabilities: 0x11ef
RX LDPC
HT20/HT40
SM Power Save disabled
RX HT20 SGI
RX HT40 SGI
TX STBC
RX STBC 1-stream
Max AMSDU length: 3839 bytes
DSSS/CCK HT40
Maximum RX AMPDU length 65535 bytes (exponent: 0x003)
Minimum RX AMPDU time spacing: 8 usec (0x06)
HT TX/RX MCS rate indexes supported: 0-23
Frequencies:
* 5180 MHz [36] (17.0 dBm) (passive scanning, no IBSS)
* 5200 MHz [40] (17.0 dBm) (passive scanning, no IBSS)
* 5220 MHz [44] (17.0 dBm) (passive scanning, no IBSS)
* 5240 MHz [48] (17.0 dBm) (passive scanning, no IBSS)
* 5260 MHz [52] (17.0 dBm) (passive scanning, no IBSS, radar detection)
* 5280 MHz [56] (17.0 dBm) (passive scanning, no IBSS, radar detection)
* 5300 MHz [60] (17.0 dBm) (passive scanning, no IBSS, radar detection)
* 5320 MHz [64] (17.0 dBm) (passive scanning, no IBSS, radar detection)
* 5500 MHz [100] (17.0 dBm) (passive scanning, no IBSS, radar detection)
* 5520 MHz [104] (17.0 dBm) (passive scanning, no IBSS, radar detection)
* 5540 MHz [108] (17.0 dBm) (passive scanning, no IBSS, radar detection)
* 5560 MHz [112] (17.0 dBm) (passive scanning, no IBSS, radar detection)
* 5580 MHz [116] (17.0 dBm) (passive scanning, no IBSS, radar detection)
* 5600 MHz [120] (17.0 dBm) (passive scanning, no IBSS, radar detection)
* 5620 MHz [124] (17.0 dBm) (passive scanning, no IBSS, radar detection)
* 5640 MHz [128] (17.0 dBm) (passive scanning, no IBSS, radar detection)
* 5660 MHz [132] (17.0 dBm) (passive scanning, no IBSS, radar detection)
* 5680 MHz [136] (17.0 dBm) (passive scanning, no IBSS, radar detection)
* 5700 MHz [140] (17.0 dBm) (passive scanning, no IBSS, radar detection)
* 5745 MHz [149] (17.0 dBm) (passive scanning, no IBSS)
* 5765 MHz [153] (17.0 dBm) (passive scanning, no IBSS)
* 5785 MHz [157] (17.0 dBm) (passive scanning, no IBSS)
* 5805 MHz [161] (17.0 dBm) (passive scanning, no IBSS)
* 5825 MHz [165] (17.0 dBm) (passive scanning, no IBSS)
Bitrates (non-HT):
* 6.0 Mbps
* 9.0 Mbps
* 12.0 Mbps
* 18.0 Mbps
* 24.0 Mbps
* 36.0 Mbps
* 48.0 Mbps
* 54.0 Mbps
max # scan SSIDs: 4
max scan IEs length: 2257 bytes
Coverage class: 0 (up to 0m)
Supported Ciphers:
* WEP40 (00-0f-ac:1)
* WEP104 (00-0f-ac:5)
* TKIP (00-0f-ac:2)
* CCMP (00-0f-ac:4)
* CMAC (00-0f-ac:6)
Available Antennas: TX 0x7 RX 0x7
Configured Antennas: TX 0x7 RX 0x7
Supported interface modes:
* IBSS
* managed
* AP
* AP/VLAN
* WDS
* monitor
* mesh point
* P2P-client
* P2P-GO
software interface modes (can always be added):
* AP/VLAN
* monitor
interface combinations are not supported
Supported commands:
* new_interface
* set_interface
* new_key
* new_beacon
* new_station
* new_mpath
* set_mesh_params
* set_bss
* authenticate
* associate
* deauthenticate
* disassociate
* join_ibss
* join_mesh
* remain_on_channel
* set_tx_bitrate_mask
* action
* frame_wait_cancel
* set_wiphy_netns
* set_channel
* set_wds_peer
* connect
* disconnect
Supported TX frame types:
* IBSS: 0x0000 0x0010 0x0020 0x0030 0x0040 0x0050 0x0060 0x0070 0x0080 0x0090 0x00a0 0x00b0 0x00c0 0x00d0 0x00e0 0x00f0
* managed: 0x0000 0x0010 0x0020 0x0030 0x0040 0x0050 0x0060 0x0070 0x0080 0x0090 0x00a0 0x00b0 0x00c0 0x00d0 0x00e0 0x00f0
* AP: 0x0000 0x0010 0x0020 0x0030 0x0040 0x0050 0x0060 0x0070 0x0080 0x0090 0x00a0 0x00b0 0x00c0 0x00d0 0x00e0 0x00f0
* AP/VLAN: 0x0000 0x0010 0x0020 0x0030 0x0040 0x0050 0x0060 0x0070 0x0080 0x0090 0x00a0 0x00b0 0x00c0 0x00d0 0x00e0 0x00f0
* mesh point: 0x0000 0x0010 0x0020 0x0030 0x0040 0x0050 0x0060 0x0070 0x0080 0x0090 0x00a0 0x00b0 0x00c0 0x00d0 0x00e0 0x00f0
* P2P-client: 0x0000 0x0010 0x0020 0x0030 0x0040 0x0050 0x0060 0x0070 0x0080 0x0090 0x00a0 0x00b0 0x00c0 0x00d0 0x00e0 0x00f0
* P2P-GO: 0x0000 0x0010 0x0020 0x0030 0x0040 0x0050 0x0060 0x0070 0x0080 0x0090 0x00a0 0x00b0 0x00c0 0x00d0 0x00e0 0x00f0
Supported RX frame types:
* IBSS: 0x00d0
* managed: 0x0040 0x00d0
* AP: 0x0000 0x0020 0x0040 0x00a0 0x00b0 0x00c0 0x00d0
* AP/VLAN: 0x0000 0x0020 0x0040 0x00a0 0x00b0 0x00c0 0x00d0
* mesh point: 0x00b0 0x00c0 0x00d0
* P2P-client: 0x0040 0x00d0
* P2P-GO: 0x0000 0x0020 0x0040 0x00a0 0x00b0 0x00c0 0x00d0
Device supports RSN-IBSS.

んんっ??
5GHz帯がおかしな事に。

とりあえず、そこは置いておいて、ひとまず、IEEE802.11b/g/nでの通信を確認します。

Capabilities: 0x11ef
RX LDPC
HT20/HT40
SM Power Save disabled
RX HT20 SGI
RX HT40 SGI
TX STBC
RX STBC 1-stream
Max AMSDU length: 3839 bytes
DSSS/CCK HT40

から、ht_capabは

[LDPC]、[HT40+]、[SHORT-GI-20]、[SHORT-GI-40]、[TX-STBC]、[RX-STBC1]、[DSSS_CCK-40]に対応していることがわかります。[HT40+]は[HT40-]でもかまいません。セカンダリをプライマリより上にするか下にするかだけの違いですから。

ここだけ修正した /etc/hostapd/hostapd.conf

--
interface=wlan0
bridge=br0
driver=nl80211

ieee80211d=1
country_code=JP

ssid=AP7
channel=5
hw_mode=g


wpa=2
wpa_passphrase=(my password)

wpa_key_mgmt=WPA-PSK
rsn_pairwise=CCMP

ieee80211n=1
wmm_enabled=1

ht_capab=[LDPC][HT40+][SHORT-GI-20][SHORT-GI-40][TX-STBC][RX-STBC1][DSSS_CCK-40]

macaddr_acl=0
deny_mac_file=/etc/hostapd/hostapd.deny

logger_syslog_level=3
--

# service hostapd restart

で問題なくIEEE802.11b/g/nのアクセスポイントが立ち上がりました。
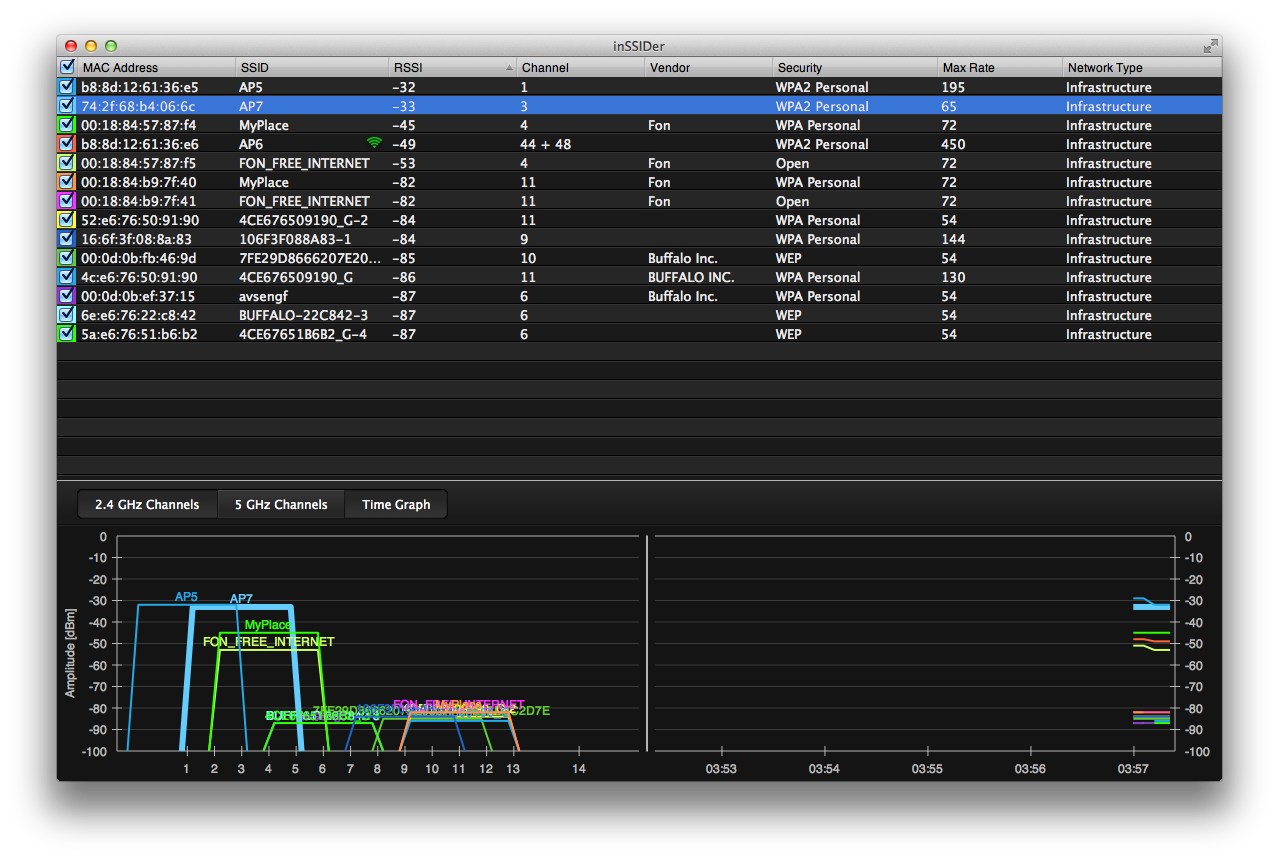
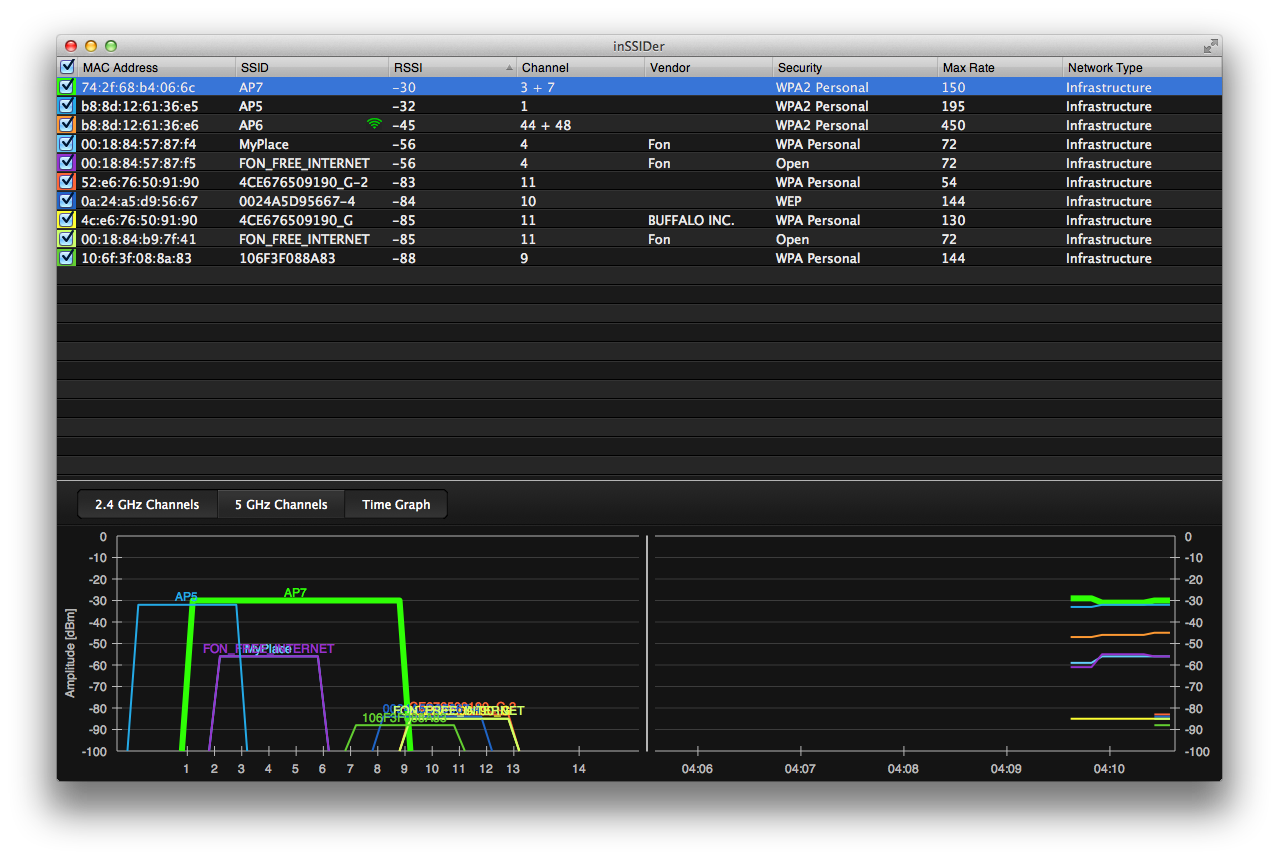
でもなにやら遅い。
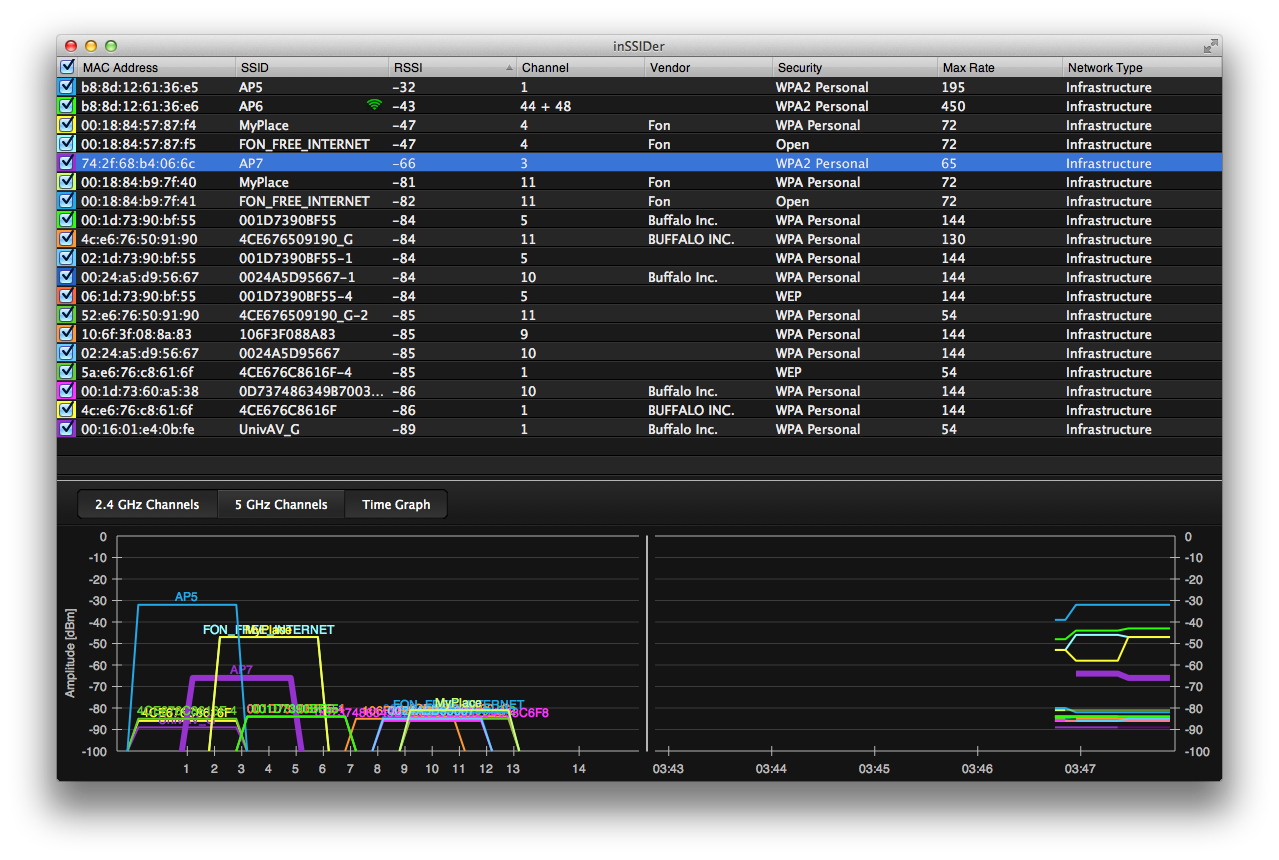
MacBook AirでのRSSIを確認してもかなり感度も高く、電波環境的にもそれほど悪くないのに通信が遅い。

# iw wlan0 station dump
Station 28:37:37:22:c2:a4 (on wlan0)
inactive time: 4 ms
rx bytes: 5108960
rx packets: 12443
tx bytes: 2054397
tx packets: 5338
tx retries: 2207
tx failed: 16
signal:   -37 dBm
signal avg: -37 dBm
tx bitrate: 144.4 MBit/s MCS 15 short GI
authorized: yes
authenticated: yes
preamble: short
WMM/WME: yes
MFP: no

同じくMacBook Airのシステム情報からは

AP7:
  PHY モード: 802.11n
  BSSID: 18:f4:6a:30:ad:98
  チャンネル: 5
  国別コード: JP
  ネットワークのタイプ: インフラストラクチャ
  セキュリティ: WPA2 パーソナル
  シグナル/ノイズ: -34 dBm / -91 dBm
  転送レート: 130
  MCS インデックス: 15
--

とどちらも20MHzしか利用していない。
トホホな状況です。

MacBook AirがMCI index15までしか対応していないので、それはさておき、40MHz利用できないのは、なんでかな。ドライバの問題か。

原因不明ですが、とにかく遅い時がある。


ためしに、hostapd.confを書き換えて、IEEE802.11aに。

channel=5
hw_mode=g


channel=44
hw_mode=a

とするだけ。

これで、
# service hostapd restart
するもfail

# hostapd -d /etc/hostapd/hostapd.conf
してみると、、、

wlan0: IEEE 802.11 Configured HT40 secondary channel (48) not found from the channel list of current mode (2) IEEE 802.11a
wlan0: IEEE 802.11 Configured channel (44) not found from the channel list of current mode (2) IEEE 802.11a
wlan0: IEEE 802.11 Hardware does not support configured channel
Could not select hw_mode and channel. (-4)
wlan0: Unable to setup interface.

う〜ん。channel 44も48も使えないよと。

iw list した時の、

Frequencies:
* 5180 MHz [36] (17.0 dBm) (passive scanning, no IBSS)
* 5200 MHz [40] (17.0 dBm) (passive scanning, no IBSS)
* 5220 MHz [44] (17.0 dBm) (passive scanning, no IBSS)
* 5240 MHz [48] (17.0 dBm) (passive scanning, no IBSS)
* 5260 MHz [52] (17.0 dBm) (passive scanning, no IBSS, radar detection)
* 5280 MHz [56] (17.0 dBm) (passive scanning, no IBSS, radar detection)
* 5300 MHz [60] (17.0 dBm) (passive scanning, no IBSS, radar detection)
* 5320 MHz [64] (17.0 dBm) (passive scanning, no IBSS, radar detection)
* 5500 MHz [100] (17.0 dBm) (passive scanning, no IBSS, radar detection)
* 5520 MHz [104] (17.0 dBm) (passive scanning, no IBSS, radar detection)
* 5540 MHz [108] (17.0 dBm) (passive scanning, no IBSS, radar detection)
* 5560 MHz [112] (17.0 dBm) (passive scanning, no IBSS, radar detection)
* 5580 MHz [116] (17.0 dBm) (passive scanning, no IBSS, radar detection)
* 5600 MHz [120] (17.0 dBm) (passive scanning, no IBSS, radar detection)
* 5620 MHz [124] (17.0 dBm) (passive scanning, no IBSS, radar detection)
* 5640 MHz [128] (17.0 dBm) (passive scanning, no IBSS, radar detection)
* 5660 MHz [132] (17.0 dBm) (passive scanning, no IBSS, radar detection)
* 5680 MHz [136] (17.0 dBm) (passive scanning, no IBSS, radar detection)
* 5700 MHz [140] (17.0 dBm) (passive scanning, no IBSS, radar detection)
* 5745 MHz [149] (17.0 dBm) (passive scanning, no IBSS)
* 5765 MHz [153] (17.0 dBm) (passive scanning, no IBSS)
* 5785 MHz [157] (17.0 dBm) (passive scanning, no IBSS)
* 5805 MHz [161] (17.0 dBm) (passive scanning, no IBSS)
* 5825 MHz [165] (17.0 dBm) (passive scanning, no IBSS)

の通り、他の帯域も使えませんでした。

# iw reg get

すると、

country JP:
(2402 - 2472 @ 40), (N/A, 20)
(2457 - 2482 @ 20), (N/A, 20)
(2474 - 2494 @ 20), (N/A, 20), NO-OFDM
(4910 - 4930 @ 10), (N/A, 23)
(4910 - 4990 @ 40), (N/A, 23)
(4930 - 4950 @ 10), (N/A, 23)
(5030 - 5045 @ 10), (N/A, 23)
(5030 - 5090 @ 40), (N/A, 23)
(5050 - 5060 @ 10), (N/A, 23)
(5170 - 5250 @ 40), (N/A, 20)
(5250 - 5330 @ 40), (N/A, 20), DFS
(5490 - 5710 @ 40), (N/A, 23), DFS

問題ないような感じですが、実際のところ5GHz帯が使えません。

他のregulatoryにsetしても、iw reg get 上は変わりますが、結局同じ結果です。

どうやら、この問題はドライバにあるようで、他のアクセスポイントが5GHz帯を使っているとそのバンドだけ、例えば40だけ空いて、

Frequencies:
* 5180 MHz [36] (17.0 dBm) (passive scanning, no IBSS)
* 5200 MHz [40] (17.0 dBm) 
* 5220 MHz [44] (17.0 dBm) (passive scanning, no IBSS)
* 5240 MHz [48] (17.0 dBm) (passive scanning, no IBSS)
* 5260 MHz [52] (17.0 dBm) (passive scanning, no IBSS, radar detection)
* 5280 MHz [56] (17.0 dBm) (passive scanning, no IBSS, radar detection)
* 5300 MHz [60] (17.0 dBm) (passive scanning, no IBSS, radar detection)
* 5320 MHz [64] (17.0 dBm) (passive scanning, no IBSS, radar detection)
* 5500 MHz [100] (17.0 dBm) (passive scanning, no IBSS, radar detection)
* 5520 MHz [104] (17.0 dBm) (passive scanning, no IBSS, radar detection)
* 5540 MHz [108] (17.0 dBm) (passive scanning, no IBSS, radar detection)
* 5560 MHz [112] (17.0 dBm) (passive scanning, no IBSS, radar detection)
* 5580 MHz [116] (17.0 dBm) (passive scanning, no IBSS, radar detection)
* 5600 MHz [120] (17.0 dBm) (passive scanning, no IBSS, radar detection)
* 5620 MHz [124] (17.0 dBm) (passive scanning, no IBSS, radar detection)
* 5640 MHz [128] (17.0 dBm) (passive scanning, no IBSS, radar detection)
* 5660 MHz [132] (17.0 dBm) (passive scanning, no IBSS, radar detection)
* 5680 MHz [136] (17.0 dBm) (passive scanning, no IBSS, radar detection)
* 5700 MHz [140] (17.0 dBm) (passive scanning, no IBSS, radar detection)
* 5745 MHz [149] (17.0 dBm) (passive scanning, no IBSS)
* 5765 MHz [153] (17.0 dBm) (passive scanning, no IBSS)
* 5785 MHz [157] (17.0 dBm) (disabled)
* 5805 MHz [161] (17.0 dBm) (disabled)
* 5825 MHz [165] (17.0 dBm) (disabled)

となり、使えるようになることがありますが、根本的には解決になっていません。

仕方ないので、ドライバを書き換えます。

ここから、最新版のmac80211ドライバをダウンロードします。


現時点での最新版は、compat-wireless-2012-05-10.tar.bz2 です。


# tar jxvf compat-wireless-2012-05-10.tar.bz2

# cd compat-wireless-2012-05-10

# ./scripts/driver-select ath9k
してもいいのですが、他のドライバが取り残されるので、やりません。

# ./scripts/driver-select restore
すれば元に全選択の状態に戻ります。

# vi ./drivers/net/wireless/ath/regd.c
で、regulatory関連のところを書き換えます。

--
#undef pr_fmt
#define pr_fmt(fmt) KBUILD_MODNAME ": " fmt

#include <linux/kernel.h>
#include <linux/printk.h>
#include <linux/export.h>
#include <net/cfg80211.h>
#include <net/mac80211.h>
#include "regd.h"
#include "regd_common.h"

static int __ath_regd_init(struct ath_regulatory *reg);

/*
 * This is a set of common rules used by our world regulatory domains.
 * We have 12 world regulatory domains. To save space we consolidate
 * the regulatory domains in 5 structures by frequency and change
 * the flags on our reg_notifier() on a case by case basis.
 */

/* Only these channels all allow active scan on all world regulatory domains */
#define ATH9K_2GHZ_CH01_11 REG_RULE(2412-10, 2462+10, 40, 0, 30, 0)

/* We enable active scan on these a case by case basis by regulatory domain */
#define ATH9K_2GHZ_CH12_13 REG_RULE(2467-10, 2472+10, 40, 0, 30, 0)
#define ATH9K_2GHZ_CH14 REG_RULE(2484-10, 2484+10, 40, 0, 30, 0)

/* We allow IBSS on these on a case by case basis by regulatory domain */
#define ATH9K_5GHZ_5150_5350 REG_RULE(5150-10, 5350+10, 40, 0, 30, 0)
#define ATH9K_5GHZ_5470_5850 REG_RULE(5470-10, 5850+10, 40, 0, 30, 0)
#define ATH9K_5GHZ_5725_5850 REG_RULE(5725-10, 5850+10, 40, 0, 30, 0)

#define ATH9K_2GHZ_ALL ATH9K_2GHZ_CH01_11, \
ATH9K_2GHZ_CH12_13, \
ATH9K_2GHZ_CH14

#define ATH9K_5GHZ_ALL ATH9K_5GHZ_5150_5350, \
ATH9K_5GHZ_5470_5850

/* This one skips what we call "mid band" */
#define ATH9K_5GHZ_NO_MIDBAND ATH9K_5GHZ_5150_5350, \
ATH9K_5GHZ_5725_5850

/* Can be used for:
 * 0x60, 0x61, 0x62 */
static const struct ieee80211_regdomain ath_world_regdom_60_61_62 = {
.n_reg_rules = 5,
.alpha2 =  "99",
.reg_rules = {
ATH9K_2GHZ_ALL,
ATH9K_5GHZ_ALL,
}
};

/* Can be used by 0x63 and 0x65 */
static const struct ieee80211_regdomain ath_world_regdom_63_65 = {
.n_reg_rules = 5,
        .alpha2 =  "99",
        .reg_rules = {
                ATH9K_2GHZ_ALL,
                ATH9K_5GHZ_ALL,
}
};

/* Can be used by 0x64 only */
static const struct ieee80211_regdomain ath_world_regdom_64 = {
.n_reg_rules = 5,
        .alpha2 =  "99",
        .reg_rules = {
                ATH9K_2GHZ_ALL,
                ATH9K_5GHZ_ALL,
}
};

/* Can be used by 0x66 and 0x69 */
static const struct ieee80211_regdomain ath_world_regdom_66_69 = {
.n_reg_rules = 5,
        .alpha2 =  "99",
        .reg_rules = {
                ATH9K_2GHZ_ALL,
                ATH9K_5GHZ_ALL,
}
};

/* Can be used by 0x67, 0x68, 0x6A and 0x6C */
static const struct ieee80211_regdomain ath_world_regdom_67_68_6A_6C = {
.n_reg_rules = 5,
        .alpha2 =  "99",
        .reg_rules = {
                ATH9K_2GHZ_ALL,
                ATH9K_5GHZ_ALL,
}
};

static inline bool is_wwr_sku(u16 regd)
{
return ((regd & COUNTRY_ERD_FLAG) != COUNTRY_ERD_FLAG) &&
(((regd & WORLD_SKU_MASK) == WORLD_SKU_PREFIX) ||
(regd == WORLD));
}

static u16 ath_regd_get_eepromRD(struct ath_regulatory *reg)
{
return reg->current_rd & ~WORLDWIDE_ROAMING_FLAG;
}

bool ath_is_world_regd(struct ath_regulatory *reg)
{
return is_wwr_sku(ath_regd_get_eepromRD(reg));
}
EXPORT_SYMBOL(ath_is_world_regd);

static const struct ieee80211_regdomain *ath_default_world_regdomain(void)
{
/* this is the most restrictive */
return &ath_world_regdom_64;
}

static const struct
ieee80211_regdomain *ath_world_regdomain(struct ath_regulatory *reg)
{
switch (reg->regpair->regDmnEnum) {
case 0x60:
case 0x61:
case 0x62:
return &ath_world_regdom_60_61_62;
case 0x63:
case 0x65:
return &ath_world_regdom_63_65;
case 0x64:
return &ath_world_regdom_64;
case 0x66:
case 0x69:
return &ath_world_regdom_66_69;
case 0x67:
case 0x68:
case 0x6A:
case 0x6C:
return &ath_world_regdom_67_68_6A_6C;
default:
WARN_ON(1);
return ath_default_world_regdomain();
}
}

bool ath_is_49ghz_allowed(u16 regdomain)
{
/* possibly more */
return regdomain == MKK9_MKKC;
}
EXPORT_SYMBOL(ath_is_49ghz_allowed);

/* Frequency is one where radar detection is required */
static bool ath_is_radar_freq(u16 center_freq)
{
return 0;  /* (center_freq >= 5260 && center_freq <= 5700); */
}

(これ以下は書き換えずなので、略)
--
赤字が書き換えたところ。

とりあえず、全ての制限を取り外しています。
あとでregulatory対応が必要。

これを

# make

# make install

して完了。

# make wlunload

# modprobe ath9k

# iw list
して確認

Frequencies:
* 5180 MHz [36] (20.0 dBm)
* 5200 MHz [40] (20.0 dBm)
* 5220 MHz [44] (20.0 dBm)
* 5240 MHz [48] (20.0 dBm)
* 5260 MHz [52] (20.0 dBm)
* 5280 MHz [56] (20.0 dBm)
* 5300 MHz [60] (20.0 dBm)
* 5320 MHz [64] (20.0 dBm)
* 5500 MHz [100] (20.0 dBm)
* 5520 MHz [104] (20.0 dBm)
* 5540 MHz [108] (20.0 dBm)
* 5560 MHz [112] (20.0 dBm)
* 5580 MHz [116] (20.0 dBm)
* 5600 MHz [120] (20.0 dBm)
* 5620 MHz [124] (20.0 dBm)
* 5640 MHz [128] (20.0 dBm)
* 5660 MHz [132] (20.0 dBm)
* 5680 MHz [136] (20.0 dBm)
* 5700 MHz [140] (20.0 dBm)
* 5745 MHz [149] (20.0 dBm)
* 5765 MHz [153] (20.0 dBm)
* 5785 MHz [157] (20.0 dBm)
* 5805 MHz [161] (20.0 dBm)
* 5825 MHz [165] (20.0 dBm)

ちゃんと空きました。

# # modinfo ath9k
filename:       /lib/modules/3.2.0-23-generic/updates/drivers/net/wireless/ath/ath9k/ath9k.ko
license:        Dual BSD/GPL
description:    Support for Atheros 802.11n wireless LAN cards.
author:         Atheros Communications
srcversion:     F895E730E8B3F5A1C902D7E
alias:          platform:ar934x_wmac
alias:          platform:ar933x_wmac
alias:          platform:ath9k
alias:          pci:v0000168Cd00000034sv*sd*bc*sc*i*
alias:          pci:v0000168Cd00000033sv*sd*bc*sc*i*
alias:          pci:v0000168Cd00000032sv*sd*bc*sc*i*
alias:          pci:v0000168Cd00000030sv*sd*bc*sc*i*
alias:          pci:v0000168Cd0000002Esv*sd*bc*sc*i*
alias:          pci:v0000168Cd0000002Dsv*sd*bc*sc*i*
alias:          pci:v0000168Cd0000002Csv*sd*bc*sc*i*
alias:          pci:v0000168Cd0000002Bsv*sd*bc*sc*i*
alias:          pci:v0000168Cd0000002Asv*sd*bc*sc*i*
alias:          pci:v0000168Cd00000029sv*sd*bc*sc*i*
alias:          pci:v0000168Cd00000027sv*sd*bc*sc*i*
alias:          pci:v0000168Cd00000024sv*sd*bc*sc*i*
alias:          pci:v0000168Cd00000023sv*sd*bc*sc*i*
depends:        ath9k_hw,ath9k_common,mac80211,ath,cfg80211,compat
vermagic:       3.2.0-23-generic SMP mod_unload modversions 
parm:           debug:Debugging mask (uint)
parm:           nohwcrypt:Disable hardware encryption (int)
parm:           blink:Enable LED blink on activity (int)
parm:           btcoex_enable:Enable wifi-BT coexistence (int)


これで、

# service hostapd restart

で一件落着。
ちゃんとIEEE802.11aで動くようになりました。

ここで、MacBook Airと構築したアクセスポイントとのベンチマークをば。


Hostapdで構築したWLAN AP

Airmac Exteme(参考値)


2.4 GHz

5 GHz

2.4 GHz

5 GHz

Sequential

Uncached Write

[4K blocks]

1.16

1.51

1.24

1.7

Uncached Write

[256K blocks]

5.97

12.18

5.9

14.77

Uncached Read

[4K blocks]

1.16

1.46

1.2

1.85

Uncached Read

[256K blocks]

5.41

9.72

6.94

14.11

Random

Uncached Write

[4K blocks]

1.31

1.5

1.02

1.99

Uncached Write

[256K blocks]

6.45

9.14

6.66

14.86

Uncached Read

[4K blocks]

1.19

1.56

1.3

1.31

Uncached Read

[256K blocks]

5.89

10.14

5.37

9.88


ベンチマークはXbenchで実施。単位はMByte。

パフォーマンスは今ひとつ Airmac Extremeに迫りきれず残念。


ちなみに、無線LAN経由でのファイルサーバからのftp getの結果は、


Hostapd 2.4GHz: 5.55 MiB/s = 46.56 Mbps

Hostapd 5GHz: 10.21 MiB/s = 85.65 Mbps


Airmac Extreme 2.4GHz: 6.26 MiB/s = 52.5 Mbps

Airmac Extreme 5GHz: 9.81 MiB/s = 82.3 Mbps


APPLE AirMac Extremeベースステーション MD031J/A

APPLE AirMac Extremeベースステーション MD031J/A

  • 出版社/メーカー: アップル
  • メディア: Personal Computers


内蔵 無線LANカードの換装 [Hostapd で無線LAN AP構築]

ZOTAC ZBOX NANO-VD01とHostapdで無線LANアクセスポイントをUbuntu 12.04上に構築しましたが、通信スピード向上のため、無線LANカードを換装しました。

ZOTAC VIA Nano X2 U4025 CPU搭載 コンパクトベアボーンPC ZBOXNANO- VD01

ZOTAC VIA Nano X2 U4025 CPU搭載 コンパクトベアボーンPC ZBOXNANO- VD01

  • 出版社/メーカー: ZOTAC
  • メディア: Personal Computers


もともと搭載されていたカードは、Atheros AR9285を搭載したBluetoothとのコンボカードでした。IEEE802.11bgn対応、1Tx/1RxでMax150Mbpsです。

これをAtheros AR9380を搭載して、IEEE802.11abgn対応、3Tx/3RxでMax450Mbpsなこちらに換装。
Mini PCI-Express(Half size)です。

image_1.jpeg
上が標準搭載されていたもの、下が新しく入手したもの。

アンテナが1つから3つになったので、使わないBluetooth用のアンテナを一つ拝借して、さらにZOTAC ZBOX NANO-AD10でも使っていない、Bluetoothのアンテナも一つ拝借してきて、合計3つ!

image_2.jpeg
ZOTAC ZBOX NANO-AD10から引きはがしてきたアンテナ。

image_3.jpeg
左に貼り付けたのが、ZOTAC ZBOX NANO-AD10から拝借してきたアンテナ。

image_4.jpeg
無事3つのアンテナを接続できました。


ところが。。。
新しいデバイスが認識されません。
lspciしても
01:00.0 Ethernet controller [0200]: Atheros Communications Inc. Device [168c:abcd] (rev 01)

と明らかにデバイスIDがおかしい。

調べてみると、デバイスの初期化が正しくなされず、正しいデバイスIDが取得されず、ドライバがロードされないことがあるみたい。

ためしに、ZOTAC ZBOX NANO-AD10に刺してみるとあっさり認識。

# lspci
Atheros Communications Inc. AR9300 Wireless LAN adaptor (rev 01)
Subsystem: Hewlett-Packard Company HB112AGN 802.11abgn 3x3 Wi-Fi Adapter

しかたなく、ZOTAC ZBOX NANO-VD01で構築した無線LANアクセスポイントの環境をZOTAC ZBOX NANO-AD10に移行。といっても、全てUSBメモリ上に構築してあるので、差し替えるだけ。

photo.JPG
差し替え後。

これでよし。

ZOTAC AMD Fusion E350 APU搭載 コンパクトベアボーンPC ZBOXNANO-AD10

ZOTAC AMD Fusion E350 APU搭載 コンパクトベアボーンPC ZBOXNANO-AD10

  • 出版社/メーカー: ZOTAC
  • メディア: Personal Computers

Ubuntu 12.04 LTS Server に Aircrack-ngをインストールする [Aircrack-ng]

Linuxマシンから周辺の無線LAN環境を調べるためにAircrack-ngをインストールするべく、apt-get installしたのですが、Ubuntuではaircrac-ngはメンテナンスされていないようで、レポジトリから消えていました。

# apt-get install aircrack-ng
Reading package lists... Done
Building dependency tree       
Reading state information... Done
Package aircrack-ng is not available, but is referred to by another package.
This may mean that the package is missing, has been obsoleted, or
is only available from another source
However the following packages replace it:
  iw:i386 iw

E: Package 'aircrack-ng' has no installation candidate


しかたないので、自分で入れます。


おっと、コンパイルする環境を入れていませんでした。

# apt-get install build-essential

入ったところで、

# tar zxvf aircrack-ng-1.1.tar.gz
# cd aircrack-ng-1.1
# make
make -C src all
make[1]: Entering directory `/root/aircrack-ng-1.1/src'
make -C osdep
make[2]: Entering directory `/root/aircrack-ng-1.1/src/osdep'
Building for Linux
make[3]: Entering directory `/root/aircrack-ng-1.1/src/osdep'
gcc -g -W -Wall -Werror -O3 -D_FILE_OFFSET_BITS=64 -D_REVISION=0  -fPIC -I..    -c -o osdep.o osdep.c
gcc -g -W -Wall -Werror -O3 -D_FILE_OFFSET_BITS=64 -D_REVISION=0  -fPIC -I..    -c -o network.o network.c
gcc -g -W -Wall -Werror -O3 -D_FILE_OFFSET_BITS=64 -D_REVISION=0  -fPIC -I..    -c -o linux.o linux.c
linux.c: In function ‘is_ndiswrapper’:
linux.c:165:17: error: variable ‘unused’ set but not used [-Werror=unused-but-set-variable]
linux.c: In function ‘linux_set_rate’:
linux.c:334:22: error: variable ‘unused’ set but not used [-Werror=unused-but-set-variable]
linux.c: In function ‘linux_set_channel’:
linux.c:807:22: error: variable ‘unused’ set but not used [-Werror=unused-but-set-variable]
linux.c: In function ‘linux_set_freq’:
linux.c:896:22: error: variable ‘unused’ set but not used [-Werror=unused-but-set-variable]
linux.c: In function ‘set_monitor’:
linux.c:1022:22: error: variable ‘unused’ set but not used [-Werror=unused-but-set-variable]
linux.c: In function ‘do_linux_open’:
linux.c:1366:12: error: variable ‘unused_str’ set but not used [-Werror=unused-but-set-variable]
linux.c:1352:15: error: variable ‘unused’ set but not used [-Werror=unused-but-set-variable]
linux.c: In function ‘get_battery_state’:
linux.c:1982:35: error: variable ‘current’ set but not used [-Werror=unused-but-set-variable]
cc1: all warnings being treated as errors
make[3]: *** [linux.o] Error 1
make[3]: Leaving directory `/root/aircrack-ng-1.1/src/osdep'
make[2]: *** [all] Error 2
make[2]: Leaving directory `/root/aircrack-ng-1.1/src/osdep'
make[1]: *** [osd] Error 2
make[1]: Leaving directory `/root/aircrack-ng-1.1/src'
make: *** [all] Error 2

なんだ、このエラー??
どうやら、Werrorで警告もエラーにされてしまっている模様。

修正します。

# vi common.mak

CFLAGS          ?= -g -W -Wall -Werror -O3

と書かれているところから、-Werrorを削除して、

CFLAGS          ?= -g -W -Wall -O3

こうします。

再度。

# make
make -C src all
make[1]: Entering directory `/root/aircrack-ng-1.1/src'
make -C osdep
make[2]: Entering directory `/root/aircrack-ng-1.1/src/osdep'
Building for Linux
make[3]: Entering directory `/root/aircrack-ng-1.1/src/osdep'
make[3]: `.os.Linux' is up to date.
make[3]: Leaving directory `/root/aircrack-ng-1.1/src/osdep'
make[2]: Leaving directory `/root/aircrack-ng-1.1/src/osdep'
gcc -g -W -Wall -O3 -D_FILE_OFFSET_BITS=64 -D_REVISION=0  -Iinclude   -c -o aircrack-ng.o aircrack-ng.c
In file included from aircrack-ng.c:65:0:
crypto.h:12:26: fatal error: openssl/hmac.h: No such file or directory
compilation terminated.
make[1]: *** [aircrack-ng.o] Error 1
make[1]: Leaving directory `/root/aircrack-ng-1.1/src'
make: *** [all] Error 2

おー。今度はopenssl関連か。

# apt-get install libssl-dev

再再度。

# make

でOK

# make install

完了!

Ubuntuで無線LANアクセスポイントを構築 [Hostapd で無線LAN AP構築]

先日購入したZOTAC ZBOX NANO-VD01を活用して、無線LANアクセスポイントを構築します。

ZOTAC VIA Nano X2 U4025 CPU搭載 コンパクトベアボーンPC ZBOXNANO- VD01

ZOTAC VIA Nano X2 U4025 CPU搭載 コンパクトベアボーンPC ZBOXNANO- VD01

  • 出版社/メーカー: ZOTAC
  • メディア: Personal Computers


無線LANアクセスポイントといっても至ってシンプルで、無線LANと有線LANをブリッジしてあげて、無線LANクライアントからのコネクションを受け付けるようにしてあげます。

Ubuntuのインストールにちょっと癖がありましたが、Ubuntu 12.04LTS をインストール後、2つのソフトウェアをインストールします。

hostapd: アクセスポイント機能を提供してくれます

bridge-utils: アクセスポイントの無線LANと有線LANをブリッジしてくれます

# apt-get install bridge-utils hostapd

まずは、hostapdの設定ですが、設定の詳細はこちら

# vi /etc/hostapd/hostapd.conf

--
interface=wlan0
bridge=br0
driver=nl80211
ssid=AP7
channel=5
hw_mode=g
wpa=2
wpa_passphrase=(your password)

wpa_key_mgmt=WPA-PSK
rsn_pairwise=CCMP

ieee80211n=1
wmm_enabled=1
ht_capab=[HT40+][SHORT-GI-40][TX-STBC][RX-STBC1][DSSS_CCK-40]

macaddr_acl=0
deny_mac_file=/etc/hostapd/hostapd.deny

logger_syslog_level=3
-- 

ついでに、アクセス拒否Macアドレス用ファイルを作成。(空)
# touch /etc/hostapd/hostapd.deny

ht_capabは iw list して得られるCapabilitiesを参考にします。(後述)

# iw list
Wiphy phy0
Band 1:
Capabilities: 0x11ce
HT20/HT40
SM Power Save disabled
RX HT40 SGI
TX STBC
RX STBC 1-stream
Max AMSDU length: 3839 bytes
DSSS/CCK HT40


さらに、起動時にhostapdが起動するように設定します。

# vi /etc/default/hostapd
--
DAEMON_CONF="/etc/hostapd/hostapd.conf"
--

次に、ブリッジの設定です。

# vi /etc/network/interfaces

--
# Loopback network interface
auto lo
iface lo inet loopback

# Wired network interface
auto eth0
iface eth0 inet static
address 0.0.0.0

# Wireless network interface
auto wlan0
iface wlan0 inet static
address 0.0.0.0

# Bridge network interface
auto br0
iface br0 inet static
address 192.168.1.253
netmask 255.255.255.0
network 192.168.1.0
broadcast 192.168.1.255
gateway 192.168.1.1
dns-nameservers 192.168.1.1
bridge_ports eth0 wlan0
bridge_stp off
--

eth0とwlan0のIPアドレスは今回設定しません。(設定しても動きますが、意味が無いので。)192.168.1.253をブリッジのIPアドレスとして設定します。

これでOK
# service hostapd start

で無線LANアクセスポイントの構築完了です。


ところで、iw listの結果から、

HT TX/RX MCS rate indexes supported: 0-7

MCS indexは0から7まで対応していることがわかります。

IEEE 802.11n-2009によれば、
MCS
index
Spatial
streams
Modulation
type
Coding
rate
Data rate (Mbit/s)
20 MHz channel40 MHz channel
800 ns GI400 ns GI800 ns GI400 ns GI
01BPSK1/26.507.2013.5015.00
11QPSK1/213.0014.4027.0030.00
21QPSK3/419.5021.7040.5045.00
3116-QAM1/226.0028.9054.0060.00
4116-QAM3/439.0043.3081.0090.00
5164-QAM2/352.0057.80108.00120.00
6164-QAM3/458.5065.00121.50135.00
7164-QAM5/665.0072.20135.00150.00
82BPSK1/213.0014.4027.0030.00
92QPSK1/226.0028.9054.0060.00
102QPSK3/439.0043.3081.0090.00
11216-QAM1/252.0057.80108.00120.00
12216-QAM3/478.0086.70162.00180.00
13264-QAM2/3104.00115.60216.00240.00
14264-QAM3/4117.00130.00243.00270.00
15264-QAM5/6130.00144.40270.00300.00
163BPSK1/219.5021.7040.5045.00
173QPSK1/239.0043.3081.0090.00
183QPSK3/458.5065.00121.50135.00
19316-QAM1/278.0086.70162.00180.00
20316-QAM3/4117.00130.00243.00270.00
21364-QAM2/3156.00173.30324.00360.00
22364-QAM3/4175.50195.00364.50405.00
23364-QAM5/6195.00216.70405.00450.00
244BPSK1/226.0028.8054.0060.00
254QPSK1/252.0057.60108.00120.00
264QPSK3/478.0086.80162.00180.00
27416-QAM1/2104.00115.60216.00240.00
28416-QAM3/4156.00173.20324.00360.00
29464-QAM2/3208.00231.20432.00480.00
30464-QAM3/4234.00260.00486.00540.00
31464-QAM5/6260.00288.80540.00600.00

ですので、最大で150Mbpsまで対応していることがわかりますが、これは、仕様どおりです。

ht_capabの設定ですが、全く設定しないと、65Mbpsが最大です。ちなみに、ieee80211n=1を設定しないと54Mbpsです。

[HT40+]: 40MHz channelになるので、最大135Mbpsとなります。
[SHORT-GI-40]: さらに400ns GIになるので、最大150Mpbsとなります。

ht_capab=[HT40+][SHORT-GI-40][TX-STBC][RX-STBC1][DSSS_CCK-40]

と設定していますが、[TX-STBC][RX-STBC1][DSSS_CCK-40]についてはスピードには効いていないように思います。


アクセスポイントを構築できたのはよいのですが、iPhoneで確認してみるとRSSIが非常に低い。
-90dBmくらい。
えっ?生きてる?って聞きたくなるくらい低い。
MacBook Air/Proから確認しても-70dBmくらい。う〜む。

試しにアンテナを外してみると、ほとんどRSSIは変わらない。つまり、役立たずです。

関係ないですが、ZOTAC ZBOX NANO-VD01を分解してみました。AD10の時みたいに。

image_1.jpeg
ハイ、バラバラです。

image_2.jpeg
グレーのケーブルはBluetoothのアンテナから出てきているものです。


ここで、思いつきました。
このBluetoothのアンテナを無線LAN用に利用できないかと。

bluetoothもIEEE802.11b/gも同じISMバンドで2.4GHz帯を利用するので原理的には使えるはずです。

さっそく選手交代。
(Before)
image.jpeg

(After)
image_4.jpeg

BT/WLAN用のhalfサイズmini PCIモジュールに刺しているアンテナのケーブルを差し替えました。

モジュール的には左が無線LAN、右がBluetoothです。
グレーのケーブルは(本来の)Bluetoothのアンテナに繋がり、黒のケーブルは無線LANのアンテナに繋がります。
(After)の絵ではそれが逆になっています。

偶然にもこの入れ替えでうまくいき、RSSIがかなり改善しました。

AP7が今回構築した無線LANアクセスポイントの名前ですが、

(Before)
スクリーンショット 2012-05-14 15.47.50.png
-66dBmこれは、標準アンテナ使用時。


(After)
スクリーンショット 2012-05-14 15.57.21.png
Bluetoothのアンテナを使用することで、-33dBmに改善。


Max Rateが65Mbpsになっていますが、これは上のhostapd.confをちゃんと設定してあげることで、150Mbpsになります。ネットワークスピードの実測的にはほぼ同じですが。。。
この改善はまた別の話で。

スクリーンショット 2012-05-14 16.10.36.png


ちなみに。iwコマンドで現在のMCS indexやbitrate、オプション設定等を確認できます。

# iw dev wlan0 station dump
Station 00:25:00:4d:f2:2f (on wlan0)
inactive time: 12412 ms
rx bytes: 1158309
rx packets: 6178
tx bytes: 1102416
tx packets: 3873
tx retries: 8961
tx failed: 1
signal:   -63 dBm
signal avg: -64 dBm
tx bitrate: 65.0 MBit/s MCS 7
authorized: yes
authenticated: yes
preamble: short
WMM/WME: yes
MFP: no

あと、iwconfigでtxpowerを設定できるので、出力を変更することで通信品質が向上する可能性があります。
Max16なので、それ以下で設定します。

たとえば、
#  iwconfig wlan0 txpower 12

# iwconfig
lo        no wireless extensions.

br0       no wireless extensions.

wlan0     IEEE 802.11bgn  Mode:Master  Frequency:2.442 GHz  Tx-Power=12 dBm   
          Retry  long limit:7   RTS thr:off   Fragment thr:off
          Power Management:on
          
eth0      no wireless extensions.

mon.wlan0  IEEE 802.11bgn  Mode:Monitor  Tx-Power=12 dBm   
          Retry  long limit:7   RTS thr:off   Fragment thr:off
          Power Management:on


ところで ZOTAC ZBOX NANO-VD01 の無線LANモジュールは

# lspci -vvv

02:00.0 Network controller: Atheros Communications Inc. AR9285 Wireless Network Adapter (PCI-Express) (rev 01)
Subsystem: AzureWave Device 2c37
Control: I/O+ Mem+ BusMaster+ SpecCycle- MemWINV- VGASnoop- ParErr- Stepping- SERR+ FastB2B- DisINTx-
Status: Cap+ 66MHz- UDF- FastB2B- ParErr- DEVSEL=fast >TAbort- <TAbort- <MAbort- >SERR- <PERR- INTx-
Latency: 0, Cache Line Size: 32 bytes
Interrupt: pin A routed to IRQ 28
Region 0: Memory at fe9f0000 (64-bit, non-prefetchable) [size=64K]
Capabilities: [40] Power Management version 3
Flags: PMEClk- DSI- D1+ D2- AuxCurrent=375mA PME(D0+,D1+,D2-,D3hot+,D3cold+)
Status: D0 NoSoftRst- PME-Enable- DSel=0 DScale=0 PME-
Capabilities: [50] MSI: Enable- Count=1/1 Maskable- 64bit-
Address: 00000000  Data: 0000
Capabilities: [60] Express (v2) Legacy Endpoint, MSI 00
DevCap: MaxPayload 128 bytes, PhantFunc 0, Latency L0s <512ns, L1 <64us
ExtTag- AttnBtn- AttnInd- PwrInd- RBE+ FLReset-
DevCtl: Report errors: Correctable- Non-Fatal- Fatal- Unsupported-
RlxdOrd+ ExtTag- PhantFunc- AuxPwr- NoSnoop-
MaxPayload 128 bytes, MaxReadReq 512 bytes
DevSta: CorrErr+ UncorrErr- FatalErr- UnsuppReq+ AuxPwr+ TransPend-
LnkCap: Port #0, Speed 2.5GT/s, Width x1, ASPM L0s L1, Latency L0 <512ns, L1 <64us
ClockPM- Surprise- LLActRep- BwNot-
LnkCtl: ASPM Disabled; RCB 64 bytes Disabled- Retrain- CommClk+
ExtSynch- ClockPM- AutWidDis- BWInt- AutBWInt-
LnkSta: Speed 2.5GT/s, Width x1, TrErr- Train- SlotClk+ DLActive- BWMgmt- ABWMgmt-
DevCap2: Completion Timeout: Not Supported, TimeoutDis+
DevCtl2: Completion Timeout: 50us to 50ms, TimeoutDis-
LnkCtl2: Target Link Speed: 2.5GT/s, EnterCompliance- SpeedDis-, Selectable De-emphasis: -6dB
Transmit Margin: Normal Operating Range, EnterModifiedCompliance- ComplianceSOS-
Compliance De-emphasis: -6dB
LnkSta2: Current De-emphasis Level: -6dB
Capabilities: [100 v1] Advanced Error Reporting
UESta: DLP- SDES- TLP- FCP- CmpltTO- CmpltAbrt- UnxCmplt- RxOF- MalfTLP- ECRC- UnsupReq- ACSViol-
UEMsk: DLP- SDES- TLP- FCP- CmpltTO- CmpltAbrt- UnxCmplt- RxOF- MalfTLP- ECRC- UnsupReq- ACSViol-
UESvrt: DLP+ SDES+ TLP- FCP+ CmpltTO- CmpltAbrt- UnxCmplt- RxOF+ MalfTLP+ ECRC- UnsupReq- ACSViol-
CESta: RxErr- BadTLP- BadDLLP- Rollover- Timeout- NonFatalErr+
CEMsk: RxErr- BadTLP- BadDLLP- Rollover- Timeout- NonFatalErr+
AERCap: First Error Pointer: 00, GenCap+ CGenEn- ChkCap+ ChkEn-
Capabilities: [140 v1] Virtual Channel
Caps: LPEVC=0 RefClk=100ns PATEntryBits=1
Arb: Fixed- WRR32- WRR64- WRR128-
Ctrl: ArbSelect=Fixed
Status: InProgress-
VC0: Caps: PATOffset=00 MaxTimeSlots=1 RejSnoopTrans-
Arb: Fixed- WRR32- WRR64- WRR128- TWRR128- WRR256-
Ctrl: Enable+ ID=0 ArbSelect=Fixed TC/VC=ff
Status: NegoPending- InProgress-
Capabilities: [160 v1] Device Serial Number 00-00-00-00-00-00-00-00
Capabilities: [170 v1] Power Budgeting <?>
Kernel driver in use: ath9k
Kernel modules: ath9k


Mac/LinuxでもBIOSアップデートできるよ! [ZOTAC ZBOX NANO-VD01]

ZOTAC ZBOXNANO-VD01のディスプレイ出力がおかしかった(上下左右切れている)ことから、とりあえずBIOSのアップデートを行おうとしたのですが、提供されているのは、Windows上からアップデートする仕組みと、同じくDOSからアップデートする仕組みです。

OSをインストールしていない状態なので、お手上げですが、手元にあるMacやLinuxのマシンを活用してアップデートする仕組みを模索しました。

Windows7もインストール初期段階で躓いていたので、Windowsを入れてからアップデートというのも難しそうです。

ということで、FreeDOSを活用して、アップデートします。

MacでもLinuxでもFreeDOSのUSBメモリー版をダウンロードします。 
wgetなりして、展開しておいてください。 
 
まだ、USBメモリーは刺しません。 
コンソールから/dev以下を確認して、USBメモリーを刺す前の状態でのディスクの数を確認します。
(Macなら、disk1,disk2,... など、Linuxなら、sda,sdb,... など) 
FreeDOSをインストールしたいUSBメモリーをMac/Linuxマシンに刺し、認識させます。
その際に、/dev以下で増えたディスクを確認します。
 
元々Mac/Linuxマシンに搭載されているディスク等が一つだけなら、disk2やsdbが増えたはずです。
 
USBメモリーがFATなどでフォーマットされていると、Macでは自動的にマウントされてしまうので、unmountします。
 
$ sudo diskutil umount /dev/disk2s1
 
USBメモリ内が一つのパーティションだけなら、disk2s1だけunmountすればOKですが、複数あれば、全てunmountしましょう。しないと、resource busyとなり、ddできません。
 
Linuxでもデスクトップ版などで自動的にマウントされてしまう場合は、同様にunmountしましょう。
 
FreeDOSをダウンロード・展開したディレクトリへ移動し、
 
$ sudo dd if=FreeDOS-1.1-USB-Boot.img of=/dev/disk2
63488+0 records in
63488+0 records out
32505856 bytes transferred in 66.204340 secs (490993 bytes/sec)
 
でUSBメモリ用のFreeDOSイメージをUSBメモリに書き込むことができ、これでFreeDOSが起動できます。
 
イメージを書き込んだUSBメモリーのルートにBIOSのDOS用アップデートトールとBIOSアップデータもおいておきます。
ZOTAC ZBOXNANO-VD01ならzafudos.exeとa1790215.romです。(2012/5/10現在。)
 
あとは、USBメモリをZOTAC ZBOXNANO-VD01に刺して、USBメモリから起動し、FreeDOSを起動します。
 
起動後は、コマンド一つで終了。(ただし、VD01では画面の上下左右が切れているので、キー入力しても何も表示されませんが。。。)
 
>  zafudos a1790215.rom
 
アップデート完了!
 
でも ZOTAC ZBOXNANO-VD01 の問題は変わりませんでした。。とほほ


ZOTAC ZBOX NANO-VD01 にUbuntu 12.04LTS (Precise Pangolin) server をインストール [ZOTAC ZBOX NANO-VD01]

Apple AirMac Extremeもいいのですが、AirMacユーティリティをVer.6に上げてからユーティリティが滅法使いにくくなってしまい、というか、ちゃんとユーティリティからAirMac Extremeが認識されなかったりで、不便きわまりないので、Ubuntuで無線LANアクセスポイントを構築すれば、いろいろな不便から解放されるのでは?ということで、Ubuntuの入れ先として、ZOTAC ZBOXNANO-VD01 を購入しました。

ZOTAC VIA Nano X2 U4025 CPU搭載 コンパクトベアボーンPC ZBOXNANO- VD01

ZOTAC VIA Nano X2 U4025 CPU搭載 コンパクトベアボーンPC ZBOXNANO- VD01

  • 出版社/メーカー: ZOTAC
  • メディア: Personal Computers
相変わらず、買ってから調べるタイプなので、ハマりました。。。

ZOTAC ZBOX NANO-VD01のスペック。

Model
 ?ModelZBOX nano VD01
Chipset
??ManufacturerVIA
??ChipsetVX900H
??GPUVIA Chrome9[トレードマーク] HCM
CPU Compatibility
??NameVIA Nano[トレードマーク] X2 U4025 (dual-core) (1.2 GHz)
??SocketNA (integrated CPU)
??Frontside busNA
Memory
??Memory TypeDDR3
??Memory Speed1066 Mhz
??Slotsna
??CapacitySupport 1 204-pin DDR3 SODIMM (up to 4GB)
Expansions
??Expansion Slotsna
3D API
??DirectX[レジスタードトレードマーク]DirectX 9
??OpenGL[レジスタードトレードマーク]NA
Networking
??Ethernet10/100/1000Mbps
??WiFi802.11n/g/b + Bluetooth 3.0
Audio
??AnalogHeadphone jack
Microphone jack
??Digital2-ch via HDMI
Storage
??Hard Drive2.5“ drive bay
??Optical Drivena
??Memory Card Reader6-in-1 (MMC/SD/SDHC/MS/MS Pro/xD)
Ports
??DVIna
??HDMI1 (PCM audio)
??DisplayPort1
??SATASATA 3.0 Gb/s compatible
??eSATA1
??IDEna
??PS2na
??Serial Portna
??USB Ports2 USB 3.0 (on back panel) 2 USB 2.0 (on back panel)
??Firewirena
Cooler
??CoolerSmartfan
Form Factor
??Form Factormini-PC
OS Compatibility
??WindowsUser installed (Windows XP Vista 7 and Linux ready)
General
??SLI SupportedNo
??Maximum Resolutionna
Other
??Graphics Output1 DisplayPort / 1 HDMI
Packaging
??Content1 x ZOTAC ZBOX nano VD01
1 x MCE compatible remote
2 x CR2032 batteries (for remote)
1 x USB IR receiver
1 x WiFi antenna
1 x VESA mount
1 x AC adapter
1 x Power cord
1 x Warranty card
1 x User manual
1 x Driver CD


CPU/Chipsetが懐かしのVIAということ以外には、AD10とあまり変わりがありません。

ZOTAC AMD Fusion E350 APU搭載 コンパクトベアボーンPC ZBOXNANO-AD10

ZOTAC AMD Fusion E350 APU搭載 コンパクトベアボーンPC ZBOXNANO-AD10

  • 出版社/メーカー: ZOTAC
  • メディア: Personal Computers
AD10がお兄ちゃんです。

お兄ちゃんはわりと従順で現在はZabbix + ZoneMinderサーバとして活躍中ですが、弟くんのVD01はちょっとお行儀が悪く、ちょっと難儀します。無線LANアクセスポイントとして使いたいので、今回もGUIは必要なく、 Ubuntu Server版で十分です。

GPUのVIA Chrome9の動きが良くないのか、インストールの初期段階で躓きます。

これは、Ubuntu11.10, Windows7 Home Premiumでも同様の現象(インストール初期段階で、HDMI出力が途絶える)が置きます。DVD/CD-ROMドライブを交換しても、発生しますし、そのような報告が他でも散見されるので、個体の問題でもないでしょう。

ちなみに、Displayportでは試していませんので、もしかするとうまくいくかも知れません。

現象としては、電源ONしてから、BIOS起動画面?が写ったり、写らず真っ黒だったり、ちらついたり、写ったとしても、左3文字分くらい、右2文字分くらい画面が切れてます。。 なので、運良く、BIOS設定メニューを起動できても、いきなり、"Main"の頭2文字が切れて、"in"とか表示され、想像力を試されるシチュエーションに突入します。

AMI BIOSなので、なんとなく、わかるので何となく設定します。

はじめ、BIOSをアップデートすれば治るかも!と思い、アップデートしましたが、全く効果なし。
そもそも、WindowsかDOSを持っていること前提でアップデータを配布しているところでちょっと時間を食う。
これはまた別のエントリーで説明します。(Mac/LinuxでもBIOSアップデートできるよ!にて。)

Ubuntu 12.04LTS (Precise Pangolin) のCD-ROMを読み込ませて、最初に言語を選択し、つぎに"Install Ubuntu Server"でエンターを押すが、CD-ROMが読み込まれる気配がした後、しばらくしてモニターには「入力がありません」と表示され先にすすめない。

いろいろ試してみましたが、解決方法はこうです。

まず、先ほどの、Install Ubuntu Server でフォーカスします。
そこで、F6キーを押します。
画面下に、起動オプションが表示されると思いますが、そこで"VGA=788"と記載されているところを消し、代わりに"xforcevesa"(もちろん前後にスペース)と打ち込み、エンター。

これで、次のステップにいけるはずです。

インストール自体はほぼ問題なし。左右と下の画面が切れていますが、辛うじて判別可能。インストールできました。インストール後も切れていますが、勘で乗り切ります。どうせsshでMacBookからログインして、その後の作業は行うので。。

ところで、インストール途中で、"Reserved BIOS boot area"というのに遭遇した。
インストール先のパーティションをルート/とswap二つだけ切って、インストールしようとすると、


image.jpeg

The partition table format in use on your disk normally requires you to create a separate partition for boot loader code. This partition should be marked for use as a "Reserved BIOS boot area" and should be at least 1MB in size. Note that this is not the same s a partition mounted on /boot.

If you do not go back to the partition menu and correct this error, boot loader installation may fail later, although it may still be possible to install the boot loader to a partition.

つまり、

このディスクでご使用のパーティションテーブルフォーマットは通常ブートローダーコードを格納するためのパーティションを別途必要としております。このパーティションは"Reserved BIOS boot area"用としてマークされ、少なくとも1MB必要とされています。

もしパーティションメニューへ戻りこのエラーを修正しない場合は、後のブートローダーのインストールに失敗するかも知れません。ただし、他のパーティションにブートローダーをインストールできる可能性もあります。


不吉なので、戻ってパーティションを切り直します。

Reserved BIOS boot area用に、念のため、100MB奮発します。あと、/とswapに割り当てます。

Reserved BIOS boot areaのパーティション設定では、Use as:でReserved BIOS boot areaを選択します。

image_2.jpeg


他はいじりません。

image_3.jpeg


結果、こんな感じです。

image_4.jpeg


これで、インストール成功。

一段落です。


ちなみに、今回、Ubuntuは8MBのUSBメモリにインストールしたのですが、VD01には2つのUSB2.0ポートと2つのUSB3.0ポートしかありません。

運用上はこれで問題ないのですが、インストール時には問題になります。

USBメモリといっても、実際はMicro SDカードで、それをUSBメモリのゲタ?を履かせてよく使います。

ゲタ↓
iBUFFALO カードリーダー/ライター microSD対応 超コンパクト ブラック BSCRMSDCBK

iBUFFALO カードリーダー/ライター microSD対応 超コンパクト ブラック BSCRMSDCBK

  • 出版社/メーカー: バッファロー
  • メディア: Personal Computers

キーボードとDVD-ROMドライブをUSB2.0ポートにつなぐと、ゲタを刺す場所がありません。。。
ちなみに、USB3.0ポートはキーボード、DVD-ROMドライブ、ゲタともに認識されません。

仕方なく、新たなゲタ=SDカード・Micro SDカード変換アダプタを用い、VD01前面のSDカードスロットに刺しますが、インストール時にDiskとしてdetectされませんでした。

苦肉の策として、USB3.0ポートを使います。

結果、無事Micro SDカードが認識され、インストールできました。

インストール後は、元のコンパクトなゲタにMIcro SDカードを移動してあげて、USB2.0ポートに刺して、起動しています。今のところ、問題なし。


ところで、resolvconfの動きが微妙に変わったのか、今まで、/etc/network/interfaces に 
 
dns-nameserver 192.168.1.1
 
と書いておけば、192.168.1.1からnameserverアドレスを受け取って、/etc/resolv.confを勝手に更新してくれていたのですが、更新してもらえず、調べてみると、
 
dns-nameservers 192.168.1.1
 
と書けと。。
sだよ、sと。 
 
dns-nameserverでも、一旦受け取って、/etc/resolvconf/resolv.conf.d/originalに書き込んでるみたいなんですけどねぇ。。resolv.confを更新してくれない。

この広告は前回の更新から一定期間経過したブログに表示されています。更新すると自動で解除されます。