SSブログ
エステ

Zabbix Server/Agent 2.0.4 install memo [ZABBIX]

Ubuntu 12.10 ServerへのZabbix 2.0.4インストールメモ

基本的には、マニュアル通り。

# apt-get install php5-gd php5-mysql openipmi libssh2-1 fping libcurl4-openssl-dev snmp build-essential libmysqld-dev libsnmp-dev libssh2-1-dev libopenipmi-dev libiksemel-dev libiksemel-utils


# tar zxvf zabbix-2.0.4.tar.gz

# groupadd zabbix

# useradd -g zabbix zabbix


MySQLでZabbixデータベースを作成します。

データベース名は「zabbix」、接続ユーザ名も「zabbix」、パスワードは「zabbixpass」

これもここを参照。

# cd ./zabbix-2.0.4

# service mysql start
mysql start/running, process 22685
root@ws:/etc/mysql# mysql -uroot
Welcome to the MySQL monitor.  Commands end with ; or \g.
Your MySQL connection id is 36
Server version: 5.5.28-0ubuntu0.12.10.2 (Ubuntu)

Copyright (c) 2000, 2012, Oracle and/or its affiliates. All rights reserved.

Oracle is a registered trademark of Oracle Corporation and/or its
affiliates. Other names may be trademarks of their respective
owners.

Type 'help;' or '\h' for help. Type '\c' to clear the current input statement.

mysql> create database zabbix character set utf8;
Query OK, 1 row affected (0.00 sec)

mysql> grant all privileges on zabbix.* to zabbix@localhost identified by 'zabbixpass';
Query OK, 0 rows affected (0.00 sec)

mysql> exit
Bye


# mysql -uroot zabbix < ./database/mysql/schema.sql

# mysql -uroot zabbix < ./database/mysql/images.sql

# mysql -uroot zabbix < ./database/mysql/data.sql

# ./configure --enable-server --enable-agent --with-mysql --with-jabber --with-libcurl --with-net-snmp --with-ssh2 --with-openipmi

# make install

# echo date.timezone=Asia/Tokyo >> /etc/php5/apache2/php.ini

# echo max_execution_time=300 >> /etc/php5/apache2/php.ini

# chown zabbix:zabbix /usr/local/etc/zabbix_*.conf

# mkdir /var/www/zabbix

# cp -a ./frontends/* /var/www/zabbix/

# chown -R zabbix:zabbix /var/www/zabbix/

# service apache2 restart

# service zabbix-server start

# echo zabbix_agent 10050/tcp >> /etc/services

# echo zabbix_trap 10051/tcp >> /etc/services

設定ファイルは今まで通り。
# vi /usr/local/etc/zabbix_server.conf

# vi /usr/local/etc/zabbix_agentd.conf


Agentも同様。

# ./configure --enable-agent

# make

# make install

細かいところは省いたけど、だいたいこんな感じでよいのでは。

Hostapd configuration [Hostapd で無線LAN AP構築]

ほとんどYoutubeをみないので、気づいていませんでしたが、このオプションをhostapd.confに書いておいてあげないと、どうやらストリーミング系が見られないみたい。


# Low priority / AC_BK = background
wmm_ac_bk_cwmin=4
wmm_ac_bk_cwmax=10
wmm_ac_bk_aifs=7
wmm_ac_bk_txop_limit=0
wmm_ac_bk_acm=0
# Note: for IEEE 802.11b mode: cWmin=5 cWmax=10
#
# Normal priority / AC_BE = best effort
wmm_ac_be_aifs=3
wmm_ac_be_cwmin=4
wmm_ac_be_cwmax=10
wmm_ac_be_txop_limit=0
wmm_ac_be_acm=0
# Note: for IEEE 802.11b mode: cWmin=5 cWmax=7
#
# High priority / AC_VI = video
wmm_ac_vi_aifs=2
wmm_ac_vi_cwmin=3
wmm_ac_vi_cwmax=4
wmm_ac_vi_txop_limit=94
wmm_ac_vi_acm=0
# Note: for IEEE 802.11b mode: cWmin=4 cWmax=5 txop_limit=188
#
# Highest priority / AC_VO = voice
wmm_ac_vo_aifs=2
wmm_ac_vo_cwmin=2
wmm_ac_vo_cwmax=3
wmm_ac_vo_txop_limit=47
wmm_ac_vo_acm=0
# Note: for IEEE 802.11b mode: cWmin=3 cWmax=4 burst=102

APC Network management card用ケーブル940-0299をつくる [Server hardware]

秋葉原のジャンクショップでAPC Smart-UPS 1500で使えるNetwork management card2 AP9631を400円ほどで手に入れたのはよいものの、AP9631はそれまで使っていたAP9617とは異なり、カードに直接シリアル接続して、通信する模様。

AP9617は940-0024をSmart-UPSのシリアルポートに接続してNetwork managementカードの設定を行うのですが、AP9631は940-0299をNetwork managementカード自体に搭載際されている2.5mm 3pin stereo plug connectorに接続します。

ですが、ですが、なかなか940-0299が見当たりません。940-0024は外見はシリアルケーブル、ピンアサインは独自。940-0299はPC側D-sub9pin、UPS側が2.5mm 3pin stereo plug な、ちょっと特殊な感じです。USのAmazonなどで見つかりますが、日本へシッピングしてくれる業者さんのは高い。

そこで、作ることに。
ピンアサイン?はこんな感じ。

秋月などで、50円くらいで手に入る9pin D-subメスコネクターと適当なステレオミニプラグ2.5mmを入手して加工します。


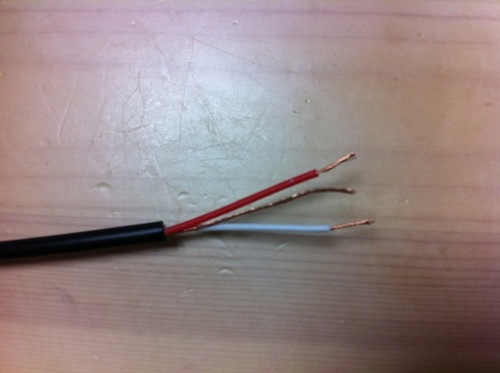
ステレオミニプラグを半分に切って、ケーブルを剥いであげます。

IMG_0836.jpg

赤→L、白→R、むきだし→GROUNDなので、赤→2、白→3、むきだし→5に半田付けしておわり。

IMG_0845.JPG


Management card2をUPSに取り付けて、作成したケーブルをいちばん左のコンソールポートにつないでOK。
たまたま、user/passwordともに初期状態だったので、apc/apcでIP addressを設定して、使えるようになりました!
IMG_0841.JPG


Hostapdを利用した無線LANアクセスポイント構築 まとめ [Hostapd で無線LAN AP構築]

これまでポイントポイントでHostapdを用いたWLANアクセスポイントの構築方法を書いてきましたが、ここでまとめ。

OS: Ubuntu 12.04 32bit server版
App: hostapd(無線LANアクセスポイント)、bridge-utils(有線LANと無線LANをブリッジ)

2.4GHzと5GHzのDual bandな無線LANアクセスポイントを構築したい場合は、それぞれに対応した無線LANカード等が2つ必要となることと、ドライバ・hostapdをビルドしなければいけないので、ビルド環境も必要です。

# apt-get install build-essential linux-source bridge-utils hostapd libssl-dev libnl-dev
# apt-get install linux-headers-$(uname -r)

# vi /etc/hostapd/hostapd-5ghz.conf
--hostapd-5ghz.conf
interface=wlan1
bridge=br0
driver=nl80211

country_code=JP
ieee80211d=1

ssid=AP8
channel=44
hw_mode=a

wpa=2
wpa_passphrase=(your password)

wpa_key_mgmt=WPA-PSK
rsn_pairwise=CCMP

ieee80211n=1
wmm_enabled=1
ht_capab=[LDPC][HT40+][SHORT-GI-20][SHORT-GI-40][TX-STBC][RX-STBC1][DSSS_CCK-40]

logger_syslog=-1
logger_syslog_level=2
ap_max_inactivity=300
disassoc_low_ack=1
#rts_threshold=2347
ap_isolate=1

dump_file=/tmp/hostapd.dump
ctrl_interface=/var/run/hostapd
--

# vi /etc/hostapd/hostapd-2.4ghz.conf
--hostapd-2.4ghz.conf
interface=wlan0
bridge=br0
driver=nl80211

country_code=JP
ieee80211d=1

ssid=AP7
channel=6
hw_mode=g

wpa=2
wpa_passphrase=(your password)

wpa_key_mgmt=WPA-PSK
rsn_pairwise=CCMP

ieee80211n=1
wmm_enabled=1
ht_capab=[LDPC][HT40+][SHORT-GI-20][SHORT-GI-40][TX-STBC][RX-STBC1][DSSS_CCK-40]

logger_syslog=-1
logger_syslog_level=2
ap_max_inactivity=300
disassoc_low_ack=1
#rts_threshold=2347
ap_isolate=1

dump_file=/tmp/hostapd.dump
ctrl_interface=/var/run/hostapd
--

5GHzの方は、AR9380チップを利用したMini PCI Expressカード
2.4GHzの方は、AR9280チップを利用したMini PCI Expressカード
です。

# echo 'DAEMON_CONF="/etc/hostapd/hostapd-5ghz.conf /etc/hostapd/hostapd-2.4ghz.conf"' > /etc/default/hostapd

# vi /etc/network/interfaces
--interfaces
# This file describes the network interfaces available on your system
# and how to activate them. For more information, see interfaces(5).

# The loopback network interface
auto lo
iface lo inet loopback

# Wired network interface
auto eth0
iface eth0 inet static
address 0.0.0.0

# Wireless network interface
auto wlan0
iface wlan0 inet static
address 0.0.0.0

auto wlan1
iface wlan1 inet static
address 0.0.0.0


# Bridge network interface
auto br0
iface br0 inet static
address 192.168.1.253
netmask 255.255.255.0
network 192.168.1.0
broadcast 192.168.1.255
gateway 192.168.1.1
dns-nameservers 192.168.1.1
bridge_ports eth0 wlan0 wlan1
bridge_stp off
--


hostapd1.0をビルドします。
# tar zxvf hostapd-1.0.tar.gz
# cd hostapd-1.0/hostapd/
# cp defconfig .config
# vi ./.config

# IEEE 802.11n (High Throughput) support
CONFIG_IEEE80211N=y

このコメントを外してあげます。

# make
# make install

# vi /etc/init.d/hostapd

DAEMON_SBIN=/usr/sbin/hostapd
↓のように書き換えます。
DAEMON_SBIN=/usr/local/bin/hostapd


compat-wirelessドライバをビルドします。
# tar jxvf compat-wireless-2012-05-10.tar.bz2
# cd compat-wireless-2012-05-10

ここに最新ドライバがあります。

# vi ./drivers/net/wireless/ath/regd.c
--regd.c
#undef pr_fmt
#define pr_fmt(fmt) KBUILD_MODNAME ": " fmt

#include <linux/kernel.h>
#include <linux/printk.h>
#include <linux/export.h>
#include <net/cfg80211.h>
#include <net/mac80211.h>
#include "regd.h"
#include "regd_common.h"

static int __ath_regd_init(struct ath_regulatory *reg);

/*
 * This is a set of common rules used by our world regulatory domains.
 * We have 12 world regulatory domains. To save space we consolidate
 * the regulatory domains in 5 structures by frequency and change
 * the flags on our reg_notifier() on a case by case basis.
 */

/* Only these channels all allow active scan on all world regulatory domains */
#define ATH9K_2GHZ_CH01_11 REG_RULE(2412-10, 2462+10, 40, 0, 30, 0)

/* We enable active scan on these a case by case basis by regulatory domain */
#define ATH9K_2GHZ_CH12_13 REG_RULE(2467-10, 2472+10, 40, 0, 30, 0)
#define ATH9K_2GHZ_CH14 REG_RULE(2484-10, 2484+10, 40, 0, 30, 0)

/* We allow IBSS on these on a case by case basis by regulatory domain */
#define ATH9K_5GHZ_5150_5350 REG_RULE(5150-10, 5350+10, 40, 0, 30, 0)
#define ATH9K_5GHZ_5470_5850 REG_RULE(5470-10, 5850+10, 40, 0, 30, 0)
#define ATH9K_5GHZ_5725_5850 REG_RULE(5725-10, 5850+10, 40, 0, 30, 0)

#define ATH9K_2GHZ_ALL ATH9K_2GHZ_CH01_11, \
ATH9K_2GHZ_CH12_13, \
ATH9K_2GHZ_CH14

#define ATH9K_5GHZ_ALL ATH9K_5GHZ_5150_5350, \
ATH9K_5GHZ_5470_5850

/* This one skips what we call "mid band" */
#define ATH9K_5GHZ_NO_MIDBAND ATH9K_5GHZ_5150_5350, \
ATH9K_5GHZ_5725_5850

/* Can be used for:
 * 0x60, 0x61, 0x62 */
static const struct ieee80211_regdomain ath_world_regdom_60_61_62 = {
.n_reg_rules = 5,
.alpha2 =  "99",
.reg_rules = {
ATH9K_2GHZ_ALL,
ATH9K_5GHZ_ALL,
}
};

/* Can be used by 0x63 and 0x65 */
static const struct ieee80211_regdomain ath_world_regdom_63_65 = {
.n_reg_rules = 5,
        .alpha2 =  "99",
        .reg_rules = {
                ATH9K_2GHZ_ALL,
                ATH9K_5GHZ_ALL,
}
};

/* Can be used by 0x64 only */
static const struct ieee80211_regdomain ath_world_regdom_64 = {
.n_reg_rules = 5,
        .alpha2 =  "99",
        .reg_rules = {
                ATH9K_2GHZ_ALL,
                ATH9K_5GHZ_ALL,
}
};

/* Can be used by 0x66 and 0x69 */
static const struct ieee80211_regdomain ath_world_regdom_66_69 = {
.n_reg_rules = 5,
        .alpha2 =  "99",
        .reg_rules = {
                ATH9K_2GHZ_ALL,
                ATH9K_5GHZ_ALL,
}
};

/* Can be used by 0x67, 0x68, 0x6A and 0x6C */
static const struct ieee80211_regdomain ath_world_regdom_67_68_6A_6C = {
.n_reg_rules = 5,
        .alpha2 =  "99",
        .reg_rules = {
                ATH9K_2GHZ_ALL,
                ATH9K_5GHZ_ALL,
}
};

static inline bool is_wwr_sku(u16 regd)
{
return ((regd & COUNTRY_ERD_FLAG) != COUNTRY_ERD_FLAG) &&
(((regd & WORLD_SKU_MASK) == WORLD_SKU_PREFIX) ||
(regd == WORLD));
}

static u16 ath_regd_get_eepromRD(struct ath_regulatory *reg)
{
return reg->current_rd & ~WORLDWIDE_ROAMING_FLAG;
}

bool ath_is_world_regd(struct ath_regulatory *reg)
{
return is_wwr_sku(ath_regd_get_eepromRD(reg));
}
EXPORT_SYMBOL(ath_is_world_regd);

static const struct ieee80211_regdomain *ath_default_world_regdomain(void)
{
/* this is the most restrictive */
return &ath_world_regdom_64;
}

static const struct
ieee80211_regdomain *ath_world_regdomain(struct ath_regulatory *reg)
{
switch (reg->regpair->regDmnEnum) {
case 0x60:
case 0x61:
case 0x62:
return &ath_world_regdom_60_61_62;
case 0x63:
case 0x65:
return &ath_world_regdom_63_65;
case 0x64:
return &ath_world_regdom_64;
case 0x66:
case 0x69:
return &ath_world_regdom_66_69;
case 0x67:
case 0x68:
case 0x6A:
case 0x6C:
return &ath_world_regdom_67_68_6A_6C;
default:
WARN_ON(1);
return ath_default_world_regdomain();
}
}

bool ath_is_49ghz_allowed(u16 regdomain)
{
/* possibly more */
return regdomain == MKK9_MKKC;
}
EXPORT_SYMBOL(ath_is_49ghz_allowed);

/* Frequency is one where radar detection is required */
static bool ath_is_radar_freq(u16 center_freq)
{
return 0;  /* (center_freq >= 5260 && center_freq <= 5700); */
}

(これ以下は書き換えずなので、略)
--
赤字が書き換えたところ。

とりあえず、全ての制限を取り外しています。
あとでregulatory対応が必要。

これを

# make
# make install

して完了。

# make wlunload
# modprobe ath9k

# service hostapd restart

これにて完了!

Intel DN2800MT を Apple Time Capsuleに組み込む [Hostapd で無線LAN AP構築]

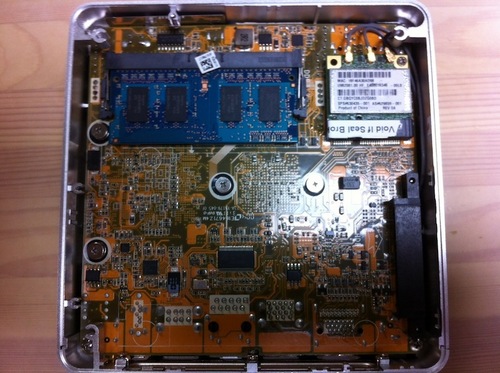
Thin Mini-ITX な Intel DN2800MT にフィットするちっちゃい筐体がどうしても見当たらないので、現役を退いて休んでいたTime Capsuleを中身を取り外して、代わりにIntel DN2800MTを組み込みました。

Intel Atom N2800(1.86GHz TDP6.5W)搭載 Mini-ITXマザーボード BOXDN2800MT

Intel Atom N2800(1.86GHz TDP6.5W)搭載 Mini-ITXマザーボード BOXDN2800MT

  • 出版社/メーカー: Intel/インテル
  • メディア: エレクトロニクス


DN2800MTは薄い、安い、Mini PCI Express x 2となかなか通好みな感じに仕上がっています。
これなら、WLANカードを2枚挿してコンパクトな無線LANアクセスポイントを構築できそうです。

組込はちょっと、面倒ですが、わりと組み込めます。

IMG_0780.JPG

完成形。電源ランプが標準のグリーン+オレンジから、レッドへ。


IMG_0779.JPG

後ろはこんな感じ。
ちゃんとしたバックパネルはまたこんど。


IMG_0775.JPG

なにかがはみ出るでもなく、収まっています。一応。


IMG_0774.JPG

標準のラバーはメンテナンス性と放熱性が悪いので外して、代わりにゴム足を4つ付けました。
また、このスチールの板は筐体と干渉する端っこは削って、DN2800MTの穴位置でネジで固定しています。


IMG_0772.jpg

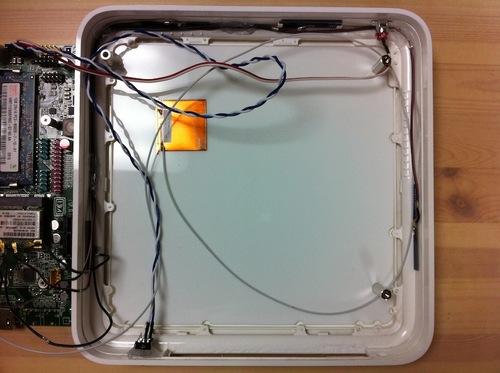
そこのスチール板を外したところ。
周囲を這っているのは、アンテナ用ケーブル。ホットボンドで固定。


IMG_0769.JPG

バックパネルは今回作らずくりぬいただけなので、スースーしています。
写真的には若干コネクタと干渉しそうに見えますが、大丈夫です。


IMG_0767.jpg

DN2800MTを外したところ。
アンテナは合計5つ必要になるので、もともとTime Capsuleで使われていた4つと、Tycoのフィルムアンテナを1枚天板面に貼り付けてなんとか。。

左下の青白ケーブルは電源ボタン。右上から伸びている赤白ケーブルは電源ランプ用LED。


IMG_0763.JPG

DN2800MTにメモリとWLANモジュールx2取り付け済みの絵。
WLANモジュールはAR9380とAR9280チップを使った製品。

たとえば、

IMG_0762.JPG

電源スイッチ引き出し部はとりあえず。。
固定は内側からホットボンドで。


IMG_0757.JPG

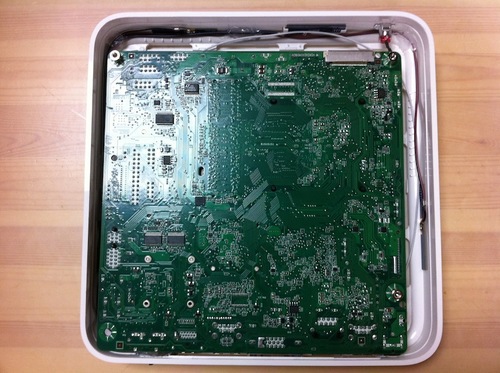
マザーボードを取り外すとこんな感じ。

右上、右下、左下から出っ張っているのは、マザーボードを固定するためのスペーサー。
左上はどうしても筐体と干渉するので、省略。

スペーサーはその下に2mmの塩ビ版を別途用意して下からネジで固定しています。

スペーサー前後の絵はこんな感じ。

                    ↓ネジ 3M
--------------------------------------- Time Capsule標準のスチール版
                    || 5mm スペーサー、ネジは上側が凹、下側が凸
====================== DN2800MT
                    ||
                    || 20mmスペーサー、ネジは上下共に凹
                    ||
====================== 2mm塩ビ版
      ↑ネジ 3M
--------------------------------------- 強力両面テープ(厚手)
====================== Apple Time Capsule 天板

スペーサーは千石電商とかで手に入るやつです。
今回はスチールのスペーサーを使っていますが、微妙な高さの調節をするには塩ビ製のスペーサーの方が便利かも。

塩ビ版他、全て、干渉するところは削る、が原則です。笑


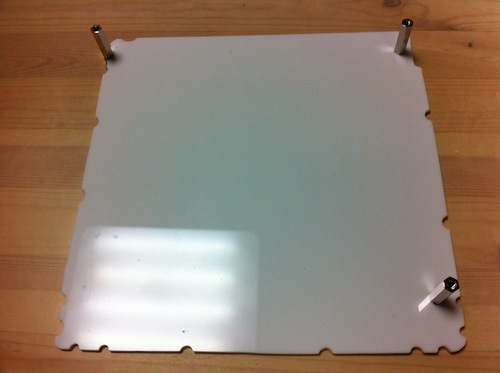
IMG_0754.jpg

塩ビ版とスペーサーだけの絵。


IMG_0753.JPG

塩ビ版を接着する前の、Apple Time Capsule 筐体(削り済み)の絵。


IMG_0752.jpg

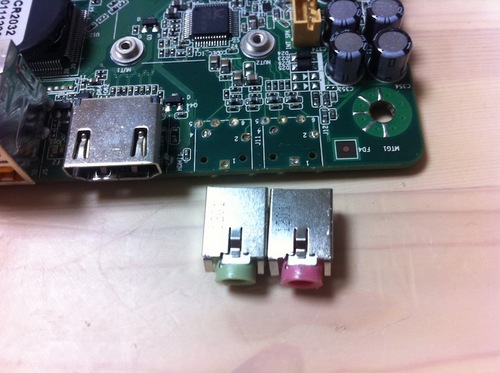
ちなみに、DN2800MTのAudio I/Fは使わないし、邪魔なので、取り外しました。


ところで、Time capsule の筐体にはスチールのフレームが内側に装着されているのですが、DN2800MTと干渉するのでコツコツ外し済み。
これね↓。
IMG_0741.JPG


基本、ルーター(といっても削る方)での工作が中心でした。。

ちなみに、熱がわりとこもって、CPU温度が70℃まで上昇することもありますが、ハングはしません。
外からでもファンの風が当たっていれば、55℃くらいまではすぐに下がります。

ところでACアダプタは適当なやつの流用です。
12V/3.8Aくらいだったかな。
たしか、9~16V でそれなりにAあれば動くはず。


Hostapd で2.4GHz帯と5GHz帯を同時に利用する。 [Hostapd で無線LAN AP構築]

Ubuntu 12.04をベースにしてHostapdを利用して無線LANアクセスポイントを構築しているのですが、a/n系とb/g/n系両対応するためのメモ。

両方を利用するためには、

1.物理的に別デバイスとして認識される無線LANデバイスが2つ必要
 (もちろん、a/n対応のものと、b/g/n対応のもの)
  両方のデバイス共に、アクセスポイントモードに対応している
  AP modeへの対応可否はこちらから確認できます。
  伴い、/etc/network/interfaces の修正が必要。

2.デバイスごとに/etc/hostapd/hostapd.confを用意することと、
  それを読み込ませるために、/etc/default/hostapdを修正する。

3.Hostapd ver. 1.0以上を利用する。
  

さて、早速1からですが、
まえのエントリ「PLANEX 無線LANアダプタ GW-USMICRON をUbuntuで利用する」でGW-USMICRONを認識させましたので、/etc/network/interfacesを修正します。

そもそも2つのデバイスが必要なの??という点については不明です。
1つのデバイスでa/b/g/nに対応しているもので何とかならないのかと、wlan0のaliasを作ったり試行錯誤しましたが、結局わからなかったため、デバイスを2つ用意して、構築した次第です。
物理的に別デバイスとは、iw listしたときに、Wiphy phy0とWiphy phy1が表示されればOKということです。

さてさて、下記の赤字の部分が追記したところです。

--/etc/network/interfaces
# This file describes the network interfaces available on your system
# and how to activate them. For more information, see interfaces(5).

# The loopback network interface
auto lo
iface lo inet loopback

# Wired network interface
auto eth0
iface eth0 inet static
address 0.0.0.0

# Wireless network interface
auto wlan0
iface wlan0 inet static
address 0.0.0.0

auto wlan1
iface wlan1 inet static
address 0.0.0.0


# Bridge network interface
auto br0
iface br0 inet static
address 192.168.1.253
netmask 255.255.255.0
network 192.168.1.0
broadcast 192.168.1.255
gateway 192.168.1.1
dns-nameservers 192.168.1.1
bridge_ports eth0 wlan0 wlan1
bridge_stp off
--


2については、もとの/etc/hostapd/hostapd.conf をベースにhostapd-2.4gh.confとhostapd-5ghz.confを作成します。

--hostapd-2.4ghz.conf
interface=wlan1
bridge=br0
driver=nl80211

country_code=JP
ieee80211d=1

ssid=AP7
channel=6
hw_mode=g

#ssid=AP8
#channel=44
#hw_mode=a

wpa=2
wpa_passphrase=12345678

wpa_key_mgmt=WPA-PSK
rsn_pairwise=CCMP

ieee80211n=1
wmm_enabled=1
ht_capab=[SMPS-STATIC][GF][HT40+][SHORT-GI-20][SHORT-GI-40][RX-STBC1]

macaddr_acl=0
deny_mac_file=/etc/hostapd/hostapd.deny

logger_syslog=-1
logger_syslog_level=3
--


--hostapd-5ghz.conf
interface=wlan0
bridge=br0
driver=nl80211

country_code=JP
ieee80211d=1

#ssid=AP7
#channel=6
#hw_mode=g

ssid=AP8
channel=44
hw_mode=a

wpa=2
wpa_passphrase=12345678

wpa_key_mgmt=WPA-PSK
rsn_pairwise=CCMP

ieee80211n=1
wmm_enabled=1
ht_capab=[LDPC][HT40+][SHORT-GI-20][SHORT-GI-40][TX-STBC][RX-STBC1][DSSS_CCK-40]

macaddr_acl=0
deny_mac_file=/etc/hostapd/hostapd.deny

logger_syslog=-1
logger_syslog_level=3
--

/etc/default/hostapd については、上で作成した2つのファイルを指定します。

DAEMON_CONF="/etc/hostapd/hostapd-5ghz.conf /etc/hostapd/hostapd-2.4ghz.conf"


最後に3ですが、Ubuntu12.04のapt-get installでインストールできるhostapdはver. 0.73で2つのデバイスを起動することには対応していないようです。そこで、ver. 1.0をビルドします。
ここから

# apt-get install libssl-dev libnl-dev

この辺が入っていないと、
../src/drivers/driver_nl80211.c:22:31: warning: netlink/genl/genl.h: No such file or directory
などとおこられます。

# tar zxvf hostapd-1.0.tar.gz
# cd hostapd-1.0
# cp defconfig .config
# vi ./.config

基本的にはそのままですが、

# IEEE 802.11n (High Throughput) support
CONFIG_IEEE80211N=y

ここだけ、コメントを外します。

# make 
# make install

あと、serviceコマンドで起動できるようにします。

# vi /etc/init.d/hostapd

#DAEMON_SBIN=/usr/sbin/hostapd
DAEMON_SBIN=/usr/local/bin/hostapd


# service hostapd start

これでOKのはず!


PLANEX 無線LANアダプタ GW-USMICRON をUbuntuで利用する [Hostapd で無線LAN AP構築]

Ubuntu 12.04でPLANEXの無線LANアダプタを利用するためのメモ。

11n/g/b対応 ゲーム機用 Wi-Fi USBアダプタ GW-USMicroN-G

11n/g/b対応 Wi-Fi USBアダプタ GW-USMicroN-G

  • 出版社/メーカー: プラネックス
  • メディア: Video Game


によれば、rt2800usbがドライバのもよう。

# lsusb -v

によると、

Bus 001 Device 002: ID 2019:ed14 PLANEX GW-USMicroN
Device Descriptor:
  bLength                18
  bDescriptorType         1
  bcdUSB               2.00
  bDeviceClass            0 (Defined at Interface level)
  bDeviceSubClass         0 
  bDeviceProtocol         0 
  bMaxPacketSize0        64
  idVendor           0x2019 PLANEX
  idProduct          0xed14 GW-USMicroN
  bcdDevice            1.01
  iManufacturer           1 Ralink
  iProduct                2 802.11 n WLAN
  iSerial                 3 1.0
  bNumConfigurations      1
(以下略)

# echo "rt2800usb" >> /etc/modules

# echo "install rt2800usb /sbin/modprobe --ignore-install rt2800usb; /bin/echo "2019 ed14" > /sys/bus/usb/drivers/rt2800usb/new_id" >> /etc/modprobe.d/usmicron.conf

# modprobe rt2800usb

これで、OKのはず。

802.11a 無線LANアクセスポイント構築 [Hostapd で無線LAN AP構築]

前回、AR9285ベースの無線LANカードからAR9380ベースの無線LANカードへ換装して、Ubuntu 12.04から認識まできました。

無事ではないですが、認識されたので、その後の設定です。
あまり変更するところはないはずですが。

# iw list
Wiphy phy0
Band 1:
Capabilities: 0x11ef
RX LDPC
HT20/HT40
SM Power Save disabled
RX HT20 SGI
RX HT40 SGI
TX STBC
RX STBC 1-stream
Max AMSDU length: 3839 bytes
DSSS/CCK HT40
Maximum RX AMPDU length 65535 bytes (exponent: 0x003)
Minimum RX AMPDU time spacing: 8 usec (0x06)
HT TX/RX MCS rate indexes supported: 0-23
Frequencies:
* 2412 MHz [1] (17.0 dBm)
* 2417 MHz [2] (17.0 dBm)
* 2422 MHz [3] (17.0 dBm)
* 2427 MHz [4] (17.0 dBm)
* 2432 MHz [5] (17.0 dBm)
* 2437 MHz [6] (17.0 dBm)
* 2442 MHz [7] (17.0 dBm)
* 2447 MHz [8] (17.0 dBm)
* 2452 MHz [9] (17.0 dBm)
* 2457 MHz [10] (17.0 dBm)
* 2462 MHz [11] (17.0 dBm)
* 2467 MHz [12] (17.0 dBm)
* 2472 MHz [13] (17.0 dBm)
* 2484 MHz [14] (disabled)
Bitrates (non-HT):
* 1.0 Mbps
* 2.0 Mbps (short preamble supported)
* 5.5 Mbps (short preamble supported)
* 11.0 Mbps (short preamble supported)
* 6.0 Mbps
* 9.0 Mbps
* 12.0 Mbps
* 18.0 Mbps
* 24.0 Mbps
* 36.0 Mbps
* 48.0 Mbps
* 54.0 Mbps
Band 2:
Capabilities: 0x11ef
RX LDPC
HT20/HT40
SM Power Save disabled
RX HT20 SGI
RX HT40 SGI
TX STBC
RX STBC 1-stream
Max AMSDU length: 3839 bytes
DSSS/CCK HT40
Maximum RX AMPDU length 65535 bytes (exponent: 0x003)
Minimum RX AMPDU time spacing: 8 usec (0x06)
HT TX/RX MCS rate indexes supported: 0-23
Frequencies:
* 5180 MHz [36] (17.0 dBm) (passive scanning, no IBSS)
* 5200 MHz [40] (17.0 dBm) (passive scanning, no IBSS)
* 5220 MHz [44] (17.0 dBm) (passive scanning, no IBSS)
* 5240 MHz [48] (17.0 dBm) (passive scanning, no IBSS)
* 5260 MHz [52] (17.0 dBm) (passive scanning, no IBSS, radar detection)
* 5280 MHz [56] (17.0 dBm) (passive scanning, no IBSS, radar detection)
* 5300 MHz [60] (17.0 dBm) (passive scanning, no IBSS, radar detection)
* 5320 MHz [64] (17.0 dBm) (passive scanning, no IBSS, radar detection)
* 5500 MHz [100] (17.0 dBm) (passive scanning, no IBSS, radar detection)
* 5520 MHz [104] (17.0 dBm) (passive scanning, no IBSS, radar detection)
* 5540 MHz [108] (17.0 dBm) (passive scanning, no IBSS, radar detection)
* 5560 MHz [112] (17.0 dBm) (passive scanning, no IBSS, radar detection)
* 5580 MHz [116] (17.0 dBm) (passive scanning, no IBSS, radar detection)
* 5600 MHz [120] (17.0 dBm) (passive scanning, no IBSS, radar detection)
* 5620 MHz [124] (17.0 dBm) (passive scanning, no IBSS, radar detection)
* 5640 MHz [128] (17.0 dBm) (passive scanning, no IBSS, radar detection)
* 5660 MHz [132] (17.0 dBm) (passive scanning, no IBSS, radar detection)
* 5680 MHz [136] (17.0 dBm) (passive scanning, no IBSS, radar detection)
* 5700 MHz [140] (17.0 dBm) (passive scanning, no IBSS, radar detection)
* 5745 MHz [149] (17.0 dBm) (passive scanning, no IBSS)
* 5765 MHz [153] (17.0 dBm) (passive scanning, no IBSS)
* 5785 MHz [157] (17.0 dBm) (passive scanning, no IBSS)
* 5805 MHz [161] (17.0 dBm) (passive scanning, no IBSS)
* 5825 MHz [165] (17.0 dBm) (passive scanning, no IBSS)
Bitrates (non-HT):
* 6.0 Mbps
* 9.0 Mbps
* 12.0 Mbps
* 18.0 Mbps
* 24.0 Mbps
* 36.0 Mbps
* 48.0 Mbps
* 54.0 Mbps
max # scan SSIDs: 4
max scan IEs length: 2257 bytes
Coverage class: 0 (up to 0m)
Supported Ciphers:
* WEP40 (00-0f-ac:1)
* WEP104 (00-0f-ac:5)
* TKIP (00-0f-ac:2)
* CCMP (00-0f-ac:4)
* CMAC (00-0f-ac:6)
Available Antennas: TX 0x7 RX 0x7
Configured Antennas: TX 0x7 RX 0x7
Supported interface modes:
* IBSS
* managed
* AP
* AP/VLAN
* WDS
* monitor
* mesh point
* P2P-client
* P2P-GO
software interface modes (can always be added):
* AP/VLAN
* monitor
interface combinations are not supported
Supported commands:
* new_interface
* set_interface
* new_key
* new_beacon
* new_station
* new_mpath
* set_mesh_params
* set_bss
* authenticate
* associate
* deauthenticate
* disassociate
* join_ibss
* join_mesh
* remain_on_channel
* set_tx_bitrate_mask
* action
* frame_wait_cancel
* set_wiphy_netns
* set_channel
* set_wds_peer
* connect
* disconnect
Supported TX frame types:
* IBSS: 0x0000 0x0010 0x0020 0x0030 0x0040 0x0050 0x0060 0x0070 0x0080 0x0090 0x00a0 0x00b0 0x00c0 0x00d0 0x00e0 0x00f0
* managed: 0x0000 0x0010 0x0020 0x0030 0x0040 0x0050 0x0060 0x0070 0x0080 0x0090 0x00a0 0x00b0 0x00c0 0x00d0 0x00e0 0x00f0
* AP: 0x0000 0x0010 0x0020 0x0030 0x0040 0x0050 0x0060 0x0070 0x0080 0x0090 0x00a0 0x00b0 0x00c0 0x00d0 0x00e0 0x00f0
* AP/VLAN: 0x0000 0x0010 0x0020 0x0030 0x0040 0x0050 0x0060 0x0070 0x0080 0x0090 0x00a0 0x00b0 0x00c0 0x00d0 0x00e0 0x00f0
* mesh point: 0x0000 0x0010 0x0020 0x0030 0x0040 0x0050 0x0060 0x0070 0x0080 0x0090 0x00a0 0x00b0 0x00c0 0x00d0 0x00e0 0x00f0
* P2P-client: 0x0000 0x0010 0x0020 0x0030 0x0040 0x0050 0x0060 0x0070 0x0080 0x0090 0x00a0 0x00b0 0x00c0 0x00d0 0x00e0 0x00f0
* P2P-GO: 0x0000 0x0010 0x0020 0x0030 0x0040 0x0050 0x0060 0x0070 0x0080 0x0090 0x00a0 0x00b0 0x00c0 0x00d0 0x00e0 0x00f0
Supported RX frame types:
* IBSS: 0x00d0
* managed: 0x0040 0x00d0
* AP: 0x0000 0x0020 0x0040 0x00a0 0x00b0 0x00c0 0x00d0
* AP/VLAN: 0x0000 0x0020 0x0040 0x00a0 0x00b0 0x00c0 0x00d0
* mesh point: 0x00b0 0x00c0 0x00d0
* P2P-client: 0x0040 0x00d0
* P2P-GO: 0x0000 0x0020 0x0040 0x00a0 0x00b0 0x00c0 0x00d0
Device supports RSN-IBSS.

んんっ??
5GHz帯がおかしな事に。

とりあえず、そこは置いておいて、ひとまず、IEEE802.11b/g/nでの通信を確認します。

Capabilities: 0x11ef
RX LDPC
HT20/HT40
SM Power Save disabled
RX HT20 SGI
RX HT40 SGI
TX STBC
RX STBC 1-stream
Max AMSDU length: 3839 bytes
DSSS/CCK HT40

から、ht_capabは

[LDPC]、[HT40+]、[SHORT-GI-20]、[SHORT-GI-40]、[TX-STBC]、[RX-STBC1]、[DSSS_CCK-40]に対応していることがわかります。[HT40+]は[HT40-]でもかまいません。セカンダリをプライマリより上にするか下にするかだけの違いですから。

ここだけ修正した /etc/hostapd/hostapd.conf

--
interface=wlan0
bridge=br0
driver=nl80211

ieee80211d=1
country_code=JP

ssid=AP7
channel=5
hw_mode=g


wpa=2
wpa_passphrase=(my password)

wpa_key_mgmt=WPA-PSK
rsn_pairwise=CCMP

ieee80211n=1
wmm_enabled=1

ht_capab=[LDPC][HT40+][SHORT-GI-20][SHORT-GI-40][TX-STBC][RX-STBC1][DSSS_CCK-40]

macaddr_acl=0
deny_mac_file=/etc/hostapd/hostapd.deny

logger_syslog_level=3
--

# service hostapd restart

で問題なくIEEE802.11b/g/nのアクセスポイントが立ち上がりました。

でもなにやら遅い。
MacBook AirでのRSSIを確認してもかなり感度も高く、電波環境的にもそれほど悪くないのに通信が遅い。

# iw wlan0 station dump
Station 28:37:37:22:c2:a4 (on wlan0)
inactive time: 4 ms
rx bytes: 5108960
rx packets: 12443
tx bytes: 2054397
tx packets: 5338
tx retries: 2207
tx failed: 16
signal:   -37 dBm
signal avg: -37 dBm
tx bitrate: 144.4 MBit/s MCS 15 short GI
authorized: yes
authenticated: yes
preamble: short
WMM/WME: yes
MFP: no

同じくMacBook Airのシステム情報からは

AP7:
  PHY モード: 802.11n
  BSSID: 18:f4:6a:30:ad:98
  チャンネル: 5
  国別コード: JP
  ネットワークのタイプ: インフラストラクチャ
  セキュリティ: WPA2 パーソナル
  シグナル/ノイズ: -34 dBm / -91 dBm
  転送レート: 130
  MCS インデックス: 15
--

とどちらも20MHzしか利用していない。
トホホな状況です。

MacBook AirがMCI index15までしか対応していないので、それはさておき、40MHz利用できないのは、なんでかな。ドライバの問題か。

原因不明ですが、とにかく遅い時がある。


ためしに、hostapd.confを書き換えて、IEEE802.11aに。

channel=5
hw_mode=g


channel=44
hw_mode=a

とするだけ。

これで、
# service hostapd restart
するもfail

# hostapd -d /etc/hostapd/hostapd.conf
してみると、、、

wlan0: IEEE 802.11 Configured HT40 secondary channel (48) not found from the channel list of current mode (2) IEEE 802.11a
wlan0: IEEE 802.11 Configured channel (44) not found from the channel list of current mode (2) IEEE 802.11a
wlan0: IEEE 802.11 Hardware does not support configured channel
Could not select hw_mode and channel. (-4)
wlan0: Unable to setup interface.

う〜ん。channel 44も48も使えないよと。

iw list した時の、

Frequencies:
* 5180 MHz [36] (17.0 dBm) (passive scanning, no IBSS)
* 5200 MHz [40] (17.0 dBm) (passive scanning, no IBSS)
* 5220 MHz [44] (17.0 dBm) (passive scanning, no IBSS)
* 5240 MHz [48] (17.0 dBm) (passive scanning, no IBSS)
* 5260 MHz [52] (17.0 dBm) (passive scanning, no IBSS, radar detection)
* 5280 MHz [56] (17.0 dBm) (passive scanning, no IBSS, radar detection)
* 5300 MHz [60] (17.0 dBm) (passive scanning, no IBSS, radar detection)
* 5320 MHz [64] (17.0 dBm) (passive scanning, no IBSS, radar detection)
* 5500 MHz [100] (17.0 dBm) (passive scanning, no IBSS, radar detection)
* 5520 MHz [104] (17.0 dBm) (passive scanning, no IBSS, radar detection)
* 5540 MHz [108] (17.0 dBm) (passive scanning, no IBSS, radar detection)
* 5560 MHz [112] (17.0 dBm) (passive scanning, no IBSS, radar detection)
* 5580 MHz [116] (17.0 dBm) (passive scanning, no IBSS, radar detection)
* 5600 MHz [120] (17.0 dBm) (passive scanning, no IBSS, radar detection)
* 5620 MHz [124] (17.0 dBm) (passive scanning, no IBSS, radar detection)
* 5640 MHz [128] (17.0 dBm) (passive scanning, no IBSS, radar detection)
* 5660 MHz [132] (17.0 dBm) (passive scanning, no IBSS, radar detection)
* 5680 MHz [136] (17.0 dBm) (passive scanning, no IBSS, radar detection)
* 5700 MHz [140] (17.0 dBm) (passive scanning, no IBSS, radar detection)
* 5745 MHz [149] (17.0 dBm) (passive scanning, no IBSS)
* 5765 MHz [153] (17.0 dBm) (passive scanning, no IBSS)
* 5785 MHz [157] (17.0 dBm) (passive scanning, no IBSS)
* 5805 MHz [161] (17.0 dBm) (passive scanning, no IBSS)
* 5825 MHz [165] (17.0 dBm) (passive scanning, no IBSS)

の通り、他の帯域も使えませんでした。

# iw reg get

すると、

country JP:
(2402 - 2472 @ 40), (N/A, 20)
(2457 - 2482 @ 20), (N/A, 20)
(2474 - 2494 @ 20), (N/A, 20), NO-OFDM
(4910 - 4930 @ 10), (N/A, 23)
(4910 - 4990 @ 40), (N/A, 23)
(4930 - 4950 @ 10), (N/A, 23)
(5030 - 5045 @ 10), (N/A, 23)
(5030 - 5090 @ 40), (N/A, 23)
(5050 - 5060 @ 10), (N/A, 23)
(5170 - 5250 @ 40), (N/A, 20)
(5250 - 5330 @ 40), (N/A, 20), DFS
(5490 - 5710 @ 40), (N/A, 23), DFS

問題ないような感じですが、実際のところ5GHz帯が使えません。

他のregulatoryにsetしても、iw reg get 上は変わりますが、結局同じ結果です。

どうやら、この問題はドライバにあるようで、他のアクセスポイントが5GHz帯を使っているとそのバンドだけ、例えば40だけ空いて、

Frequencies:
* 5180 MHz [36] (17.0 dBm) (passive scanning, no IBSS)
* 5200 MHz [40] (17.0 dBm) 
* 5220 MHz [44] (17.0 dBm) (passive scanning, no IBSS)
* 5240 MHz [48] (17.0 dBm) (passive scanning, no IBSS)
* 5260 MHz [52] (17.0 dBm) (passive scanning, no IBSS, radar detection)
* 5280 MHz [56] (17.0 dBm) (passive scanning, no IBSS, radar detection)
* 5300 MHz [60] (17.0 dBm) (passive scanning, no IBSS, radar detection)
* 5320 MHz [64] (17.0 dBm) (passive scanning, no IBSS, radar detection)
* 5500 MHz [100] (17.0 dBm) (passive scanning, no IBSS, radar detection)
* 5520 MHz [104] (17.0 dBm) (passive scanning, no IBSS, radar detection)
* 5540 MHz [108] (17.0 dBm) (passive scanning, no IBSS, radar detection)
* 5560 MHz [112] (17.0 dBm) (passive scanning, no IBSS, radar detection)
* 5580 MHz [116] (17.0 dBm) (passive scanning, no IBSS, radar detection)
* 5600 MHz [120] (17.0 dBm) (passive scanning, no IBSS, radar detection)
* 5620 MHz [124] (17.0 dBm) (passive scanning, no IBSS, radar detection)
* 5640 MHz [128] (17.0 dBm) (passive scanning, no IBSS, radar detection)
* 5660 MHz [132] (17.0 dBm) (passive scanning, no IBSS, radar detection)
* 5680 MHz [136] (17.0 dBm) (passive scanning, no IBSS, radar detection)
* 5700 MHz [140] (17.0 dBm) (passive scanning, no IBSS, radar detection)
* 5745 MHz [149] (17.0 dBm) (passive scanning, no IBSS)
* 5765 MHz [153] (17.0 dBm) (passive scanning, no IBSS)
* 5785 MHz [157] (17.0 dBm) (disabled)
* 5805 MHz [161] (17.0 dBm) (disabled)
* 5825 MHz [165] (17.0 dBm) (disabled)

となり、使えるようになることがありますが、根本的には解決になっていません。

仕方ないので、ドライバを書き換えます。

ここから、最新版のmac80211ドライバをダウンロードします。


現時点での最新版は、compat-wireless-2012-05-10.tar.bz2 です。


# tar jxvf compat-wireless-2012-05-10.tar.bz2

# cd compat-wireless-2012-05-10

# ./scripts/driver-select ath9k
してもいいのですが、他のドライバが取り残されるので、やりません。

# ./scripts/driver-select restore
すれば元に全選択の状態に戻ります。

# vi ./drivers/net/wireless/ath/regd.c
で、regulatory関連のところを書き換えます。

--
#undef pr_fmt
#define pr_fmt(fmt) KBUILD_MODNAME ": " fmt

#include <linux/kernel.h>
#include <linux/printk.h>
#include <linux/export.h>
#include <net/cfg80211.h>
#include <net/mac80211.h>
#include "regd.h"
#include "regd_common.h"

static int __ath_regd_init(struct ath_regulatory *reg);

/*
 * This is a set of common rules used by our world regulatory domains.
 * We have 12 world regulatory domains. To save space we consolidate
 * the regulatory domains in 5 structures by frequency and change
 * the flags on our reg_notifier() on a case by case basis.
 */

/* Only these channels all allow active scan on all world regulatory domains */
#define ATH9K_2GHZ_CH01_11 REG_RULE(2412-10, 2462+10, 40, 0, 30, 0)

/* We enable active scan on these a case by case basis by regulatory domain */
#define ATH9K_2GHZ_CH12_13 REG_RULE(2467-10, 2472+10, 40, 0, 30, 0)
#define ATH9K_2GHZ_CH14 REG_RULE(2484-10, 2484+10, 40, 0, 30, 0)

/* We allow IBSS on these on a case by case basis by regulatory domain */
#define ATH9K_5GHZ_5150_5350 REG_RULE(5150-10, 5350+10, 40, 0, 30, 0)
#define ATH9K_5GHZ_5470_5850 REG_RULE(5470-10, 5850+10, 40, 0, 30, 0)
#define ATH9K_5GHZ_5725_5850 REG_RULE(5725-10, 5850+10, 40, 0, 30, 0)

#define ATH9K_2GHZ_ALL ATH9K_2GHZ_CH01_11, \
ATH9K_2GHZ_CH12_13, \
ATH9K_2GHZ_CH14

#define ATH9K_5GHZ_ALL ATH9K_5GHZ_5150_5350, \
ATH9K_5GHZ_5470_5850

/* This one skips what we call "mid band" */
#define ATH9K_5GHZ_NO_MIDBAND ATH9K_5GHZ_5150_5350, \
ATH9K_5GHZ_5725_5850

/* Can be used for:
 * 0x60, 0x61, 0x62 */
static const struct ieee80211_regdomain ath_world_regdom_60_61_62 = {
.n_reg_rules = 5,
.alpha2 =  "99",
.reg_rules = {
ATH9K_2GHZ_ALL,
ATH9K_5GHZ_ALL,
}
};

/* Can be used by 0x63 and 0x65 */
static const struct ieee80211_regdomain ath_world_regdom_63_65 = {
.n_reg_rules = 5,
        .alpha2 =  "99",
        .reg_rules = {
                ATH9K_2GHZ_ALL,
                ATH9K_5GHZ_ALL,
}
};

/* Can be used by 0x64 only */
static const struct ieee80211_regdomain ath_world_regdom_64 = {
.n_reg_rules = 5,
        .alpha2 =  "99",
        .reg_rules = {
                ATH9K_2GHZ_ALL,
                ATH9K_5GHZ_ALL,
}
};

/* Can be used by 0x66 and 0x69 */
static const struct ieee80211_regdomain ath_world_regdom_66_69 = {
.n_reg_rules = 5,
        .alpha2 =  "99",
        .reg_rules = {
                ATH9K_2GHZ_ALL,
                ATH9K_5GHZ_ALL,
}
};

/* Can be used by 0x67, 0x68, 0x6A and 0x6C */
static const struct ieee80211_regdomain ath_world_regdom_67_68_6A_6C = {
.n_reg_rules = 5,
        .alpha2 =  "99",
        .reg_rules = {
                ATH9K_2GHZ_ALL,
                ATH9K_5GHZ_ALL,
}
};

static inline bool is_wwr_sku(u16 regd)
{
return ((regd & COUNTRY_ERD_FLAG) != COUNTRY_ERD_FLAG) &&
(((regd & WORLD_SKU_MASK) == WORLD_SKU_PREFIX) ||
(regd == WORLD));
}

static u16 ath_regd_get_eepromRD(struct ath_regulatory *reg)
{
return reg->current_rd & ~WORLDWIDE_ROAMING_FLAG;
}

bool ath_is_world_regd(struct ath_regulatory *reg)
{
return is_wwr_sku(ath_regd_get_eepromRD(reg));
}
EXPORT_SYMBOL(ath_is_world_regd);

static const struct ieee80211_regdomain *ath_default_world_regdomain(void)
{
/* this is the most restrictive */
return &ath_world_regdom_64;
}

static const struct
ieee80211_regdomain *ath_world_regdomain(struct ath_regulatory *reg)
{
switch (reg->regpair->regDmnEnum) {
case 0x60:
case 0x61:
case 0x62:
return &ath_world_regdom_60_61_62;
case 0x63:
case 0x65:
return &ath_world_regdom_63_65;
case 0x64:
return &ath_world_regdom_64;
case 0x66:
case 0x69:
return &ath_world_regdom_66_69;
case 0x67:
case 0x68:
case 0x6A:
case 0x6C:
return &ath_world_regdom_67_68_6A_6C;
default:
WARN_ON(1);
return ath_default_world_regdomain();
}
}

bool ath_is_49ghz_allowed(u16 regdomain)
{
/* possibly more */
return regdomain == MKK9_MKKC;
}
EXPORT_SYMBOL(ath_is_49ghz_allowed);

/* Frequency is one where radar detection is required */
static bool ath_is_radar_freq(u16 center_freq)
{
return 0;  /* (center_freq >= 5260 && center_freq <= 5700); */
}

(これ以下は書き換えずなので、略)
--
赤字が書き換えたところ。

とりあえず、全ての制限を取り外しています。
あとでregulatory対応が必要。

これを

# make

# make install

して完了。

# make wlunload

# modprobe ath9k

# iw list
して確認

Frequencies:
* 5180 MHz [36] (20.0 dBm)
* 5200 MHz [40] (20.0 dBm)
* 5220 MHz [44] (20.0 dBm)
* 5240 MHz [48] (20.0 dBm)
* 5260 MHz [52] (20.0 dBm)
* 5280 MHz [56] (20.0 dBm)
* 5300 MHz [60] (20.0 dBm)
* 5320 MHz [64] (20.0 dBm)
* 5500 MHz [100] (20.0 dBm)
* 5520 MHz [104] (20.0 dBm)
* 5540 MHz [108] (20.0 dBm)
* 5560 MHz [112] (20.0 dBm)
* 5580 MHz [116] (20.0 dBm)
* 5600 MHz [120] (20.0 dBm)
* 5620 MHz [124] (20.0 dBm)
* 5640 MHz [128] (20.0 dBm)
* 5660 MHz [132] (20.0 dBm)
* 5680 MHz [136] (20.0 dBm)
* 5700 MHz [140] (20.0 dBm)
* 5745 MHz [149] (20.0 dBm)
* 5765 MHz [153] (20.0 dBm)
* 5785 MHz [157] (20.0 dBm)
* 5805 MHz [161] (20.0 dBm)
* 5825 MHz [165] (20.0 dBm)

ちゃんと空きました。

# # modinfo ath9k
filename:       /lib/modules/3.2.0-23-generic/updates/drivers/net/wireless/ath/ath9k/ath9k.ko
license:        Dual BSD/GPL
description:    Support for Atheros 802.11n wireless LAN cards.
author:         Atheros Communications
srcversion:     F895E730E8B3F5A1C902D7E
alias:          platform:ar934x_wmac
alias:          platform:ar933x_wmac
alias:          platform:ath9k
alias:          pci:v0000168Cd00000034sv*sd*bc*sc*i*
alias:          pci:v0000168Cd00000033sv*sd*bc*sc*i*
alias:          pci:v0000168Cd00000032sv*sd*bc*sc*i*
alias:          pci:v0000168Cd00000030sv*sd*bc*sc*i*
alias:          pci:v0000168Cd0000002Esv*sd*bc*sc*i*
alias:          pci:v0000168Cd0000002Dsv*sd*bc*sc*i*
alias:          pci:v0000168Cd0000002Csv*sd*bc*sc*i*
alias:          pci:v0000168Cd0000002Bsv*sd*bc*sc*i*
alias:          pci:v0000168Cd0000002Asv*sd*bc*sc*i*
alias:          pci:v0000168Cd00000029sv*sd*bc*sc*i*
alias:          pci:v0000168Cd00000027sv*sd*bc*sc*i*
alias:          pci:v0000168Cd00000024sv*sd*bc*sc*i*
alias:          pci:v0000168Cd00000023sv*sd*bc*sc*i*
depends:        ath9k_hw,ath9k_common,mac80211,ath,cfg80211,compat
vermagic:       3.2.0-23-generic SMP mod_unload modversions 
parm:           debug:Debugging mask (uint)
parm:           nohwcrypt:Disable hardware encryption (int)
parm:           blink:Enable LED blink on activity (int)
parm:           btcoex_enable:Enable wifi-BT coexistence (int)


これで、

# service hostapd restart

で一件落着。
ちゃんとIEEE802.11aで動くようになりました。

ここで、MacBook Airと構築したアクセスポイントとのベンチマークをば。


Hostapdで構築したWLAN AP

Airmac Exteme(参考値)


2.4 GHz

5 GHz

2.4 GHz

5 GHz

Sequential

Uncached Write

[4K blocks]

1.16

1.51

1.24

1.7

Uncached Write

[256K blocks]

5.97

12.18

5.9

14.77

Uncached Read

[4K blocks]

1.16

1.46

1.2

1.85

Uncached Read

[256K blocks]

5.41

9.72

6.94

14.11

Random

Uncached Write

[4K blocks]

1.31

1.5

1.02

1.99

Uncached Write

[256K blocks]

6.45

9.14

6.66

14.86

Uncached Read

[4K blocks]

1.19

1.56

1.3

1.31

Uncached Read

[256K blocks]

5.89

10.14

5.37

9.88


ベンチマークはXbenchで実施。単位はMByte。

パフォーマンスは今ひとつ Airmac Extremeに迫りきれず残念。


ちなみに、無線LAN経由でのファイルサーバからのftp getの結果は、


Hostapd 2.4GHz: 5.55 MiB/s = 46.56 Mbps

Hostapd 5GHz: 10.21 MiB/s = 85.65 Mbps


Airmac Extreme 2.4GHz: 6.26 MiB/s = 52.5 Mbps

Airmac Extreme 5GHz: 9.81 MiB/s = 82.3 Mbps


APPLE AirMac Extremeベースステーション MD031J/A

APPLE AirMac Extremeベースステーション MD031J/A

  • 出版社/メーカー: アップル
  • メディア: Personal Computers


内蔵 無線LANカードの換装 [Hostapd で無線LAN AP構築]

ZOTAC ZBOX NANO-VD01とHostapdで無線LANアクセスポイントをUbuntu 12.04上に構築しましたが、通信スピード向上のため、無線LANカードを換装しました。

ZOTAC VIA Nano X2 U4025 CPU搭載 コンパクトベアボーンPC ZBOXNANO- VD01

ZOTAC VIA Nano X2 U4025 CPU搭載 コンパクトベアボーンPC ZBOXNANO- VD01

  • 出版社/メーカー: ZOTAC
  • メディア: Personal Computers


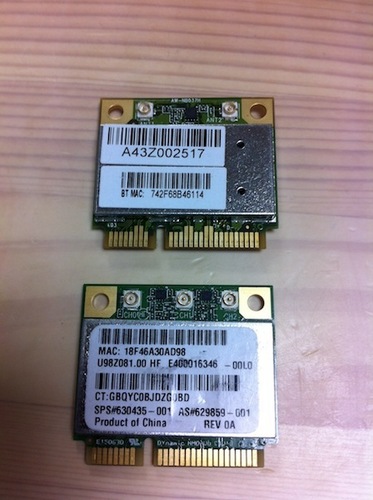
もともと搭載されていたカードは、Atheros AR9285を搭載したBluetoothとのコンボカードでした。IEEE802.11bgn対応、1Tx/1RxでMax150Mbpsです。

これをAtheros AR9380を搭載して、IEEE802.11abgn対応、3Tx/3RxでMax450Mbpsなこちらに換装。
Mini PCI-Express(Half size)です。

image_1.jpeg
上が標準搭載されていたもの、下が新しく入手したもの。

アンテナが1つから3つになったので、使わないBluetooth用のアンテナを一つ拝借して、さらにZOTAC ZBOX NANO-AD10でも使っていない、Bluetoothのアンテナも一つ拝借してきて、合計3つ!

image_2.jpeg
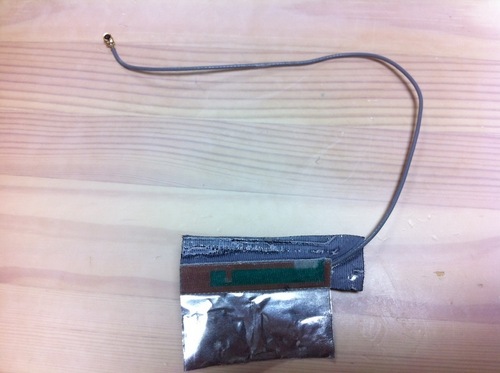
ZOTAC ZBOX NANO-AD10から引きはがしてきたアンテナ。

image_3.jpeg
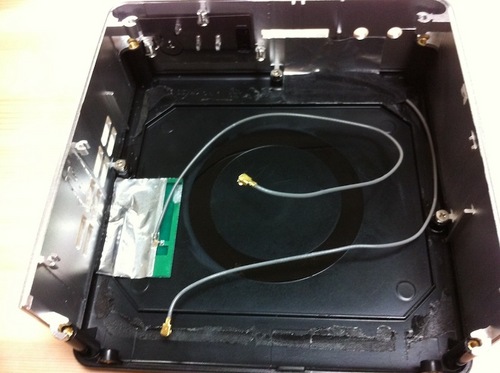
左に貼り付けたのが、ZOTAC ZBOX NANO-AD10から拝借してきたアンテナ。

image_4.jpeg
無事3つのアンテナを接続できました。


ところが。。。
新しいデバイスが認識されません。
lspciしても
01:00.0 Ethernet controller [0200]: Atheros Communications Inc. Device [168c:abcd] (rev 01)

と明らかにデバイスIDがおかしい。

調べてみると、デバイスの初期化が正しくなされず、正しいデバイスIDが取得されず、ドライバがロードされないことがあるみたい。

ためしに、ZOTAC ZBOX NANO-AD10に刺してみるとあっさり認識。

# lspci
Atheros Communications Inc. AR9300 Wireless LAN adaptor (rev 01)
Subsystem: Hewlett-Packard Company HB112AGN 802.11abgn 3x3 Wi-Fi Adapter

しかたなく、ZOTAC ZBOX NANO-VD01で構築した無線LANアクセスポイントの環境をZOTAC ZBOX NANO-AD10に移行。といっても、全てUSBメモリ上に構築してあるので、差し替えるだけ。

photo.JPG
差し替え後。

これでよし。

ZOTAC AMD Fusion E350 APU搭載 コンパクトベアボーンPC ZBOXNANO-AD10

ZOTAC AMD Fusion E350 APU搭載 コンパクトベアボーンPC ZBOXNANO-AD10

  • 出版社/メーカー: ZOTAC
  • メディア: Personal Computers

Ubuntu 12.04 LTS Server に Aircrack-ngをインストールする [Aircrack-ng]

Linuxマシンから周辺の無線LAN環境を調べるためにAircrack-ngをインストールするべく、apt-get installしたのですが、Ubuntuではaircrac-ngはメンテナンスされていないようで、レポジトリから消えていました。

# apt-get install aircrack-ng
Reading package lists... Done
Building dependency tree       
Reading state information... Done
Package aircrack-ng is not available, but is referred to by another package.
This may mean that the package is missing, has been obsoleted, or
is only available from another source
However the following packages replace it:
  iw:i386 iw

E: Package 'aircrack-ng' has no installation candidate


しかたないので、自分で入れます。


おっと、コンパイルする環境を入れていませんでした。

# apt-get install build-essential

入ったところで、

# tar zxvf aircrack-ng-1.1.tar.gz
# cd aircrack-ng-1.1
# make
make -C src all
make[1]: Entering directory `/root/aircrack-ng-1.1/src'
make -C osdep
make[2]: Entering directory `/root/aircrack-ng-1.1/src/osdep'
Building for Linux
make[3]: Entering directory `/root/aircrack-ng-1.1/src/osdep'
gcc -g -W -Wall -Werror -O3 -D_FILE_OFFSET_BITS=64 -D_REVISION=0  -fPIC -I..    -c -o osdep.o osdep.c
gcc -g -W -Wall -Werror -O3 -D_FILE_OFFSET_BITS=64 -D_REVISION=0  -fPIC -I..    -c -o network.o network.c
gcc -g -W -Wall -Werror -O3 -D_FILE_OFFSET_BITS=64 -D_REVISION=0  -fPIC -I..    -c -o linux.o linux.c
linux.c: In function ‘is_ndiswrapper’:
linux.c:165:17: error: variable ‘unused’ set but not used [-Werror=unused-but-set-variable]
linux.c: In function ‘linux_set_rate’:
linux.c:334:22: error: variable ‘unused’ set but not used [-Werror=unused-but-set-variable]
linux.c: In function ‘linux_set_channel’:
linux.c:807:22: error: variable ‘unused’ set but not used [-Werror=unused-but-set-variable]
linux.c: In function ‘linux_set_freq’:
linux.c:896:22: error: variable ‘unused’ set but not used [-Werror=unused-but-set-variable]
linux.c: In function ‘set_monitor’:
linux.c:1022:22: error: variable ‘unused’ set but not used [-Werror=unused-but-set-variable]
linux.c: In function ‘do_linux_open’:
linux.c:1366:12: error: variable ‘unused_str’ set but not used [-Werror=unused-but-set-variable]
linux.c:1352:15: error: variable ‘unused’ set but not used [-Werror=unused-but-set-variable]
linux.c: In function ‘get_battery_state’:
linux.c:1982:35: error: variable ‘current’ set but not used [-Werror=unused-but-set-variable]
cc1: all warnings being treated as errors
make[3]: *** [linux.o] Error 1
make[3]: Leaving directory `/root/aircrack-ng-1.1/src/osdep'
make[2]: *** [all] Error 2
make[2]: Leaving directory `/root/aircrack-ng-1.1/src/osdep'
make[1]: *** [osd] Error 2
make[1]: Leaving directory `/root/aircrack-ng-1.1/src'
make: *** [all] Error 2

なんだ、このエラー??
どうやら、Werrorで警告もエラーにされてしまっている模様。

修正します。

# vi common.mak

CFLAGS          ?= -g -W -Wall -Werror -O3

と書かれているところから、-Werrorを削除して、

CFLAGS          ?= -g -W -Wall -O3

こうします。

再度。

# make
make -C src all
make[1]: Entering directory `/root/aircrack-ng-1.1/src'
make -C osdep
make[2]: Entering directory `/root/aircrack-ng-1.1/src/osdep'
Building for Linux
make[3]: Entering directory `/root/aircrack-ng-1.1/src/osdep'
make[3]: `.os.Linux' is up to date.
make[3]: Leaving directory `/root/aircrack-ng-1.1/src/osdep'
make[2]: Leaving directory `/root/aircrack-ng-1.1/src/osdep'
gcc -g -W -Wall -O3 -D_FILE_OFFSET_BITS=64 -D_REVISION=0  -Iinclude   -c -o aircrack-ng.o aircrack-ng.c
In file included from aircrack-ng.c:65:0:
crypto.h:12:26: fatal error: openssl/hmac.h: No such file or directory
compilation terminated.
make[1]: *** [aircrack-ng.o] Error 1
make[1]: Leaving directory `/root/aircrack-ng-1.1/src'
make: *** [all] Error 2

おー。今度はopenssl関連か。

# apt-get install libssl-dev

再再度。

# make

でOK

# make install

完了!

この広告は前回の更新から一定期間経過したブログに表示されています。更新すると自動で解除されます。